I still remember the absolute terror I felt the first time I held traditional clippers over my rescue dog’s jet-black nails, hearing him whimper as I accidentally nicked the quick. That heartbreaking moment sent me on a mission to find a better way, which is when I discovered how to cut black dog nails using flashlight tricks to safely illuminate the path. Today, our team at Zenpaw is proud to share these gentle, stress-free secrets along with our whisper-quiet tools to keep your dog’s paws healthy and happy.
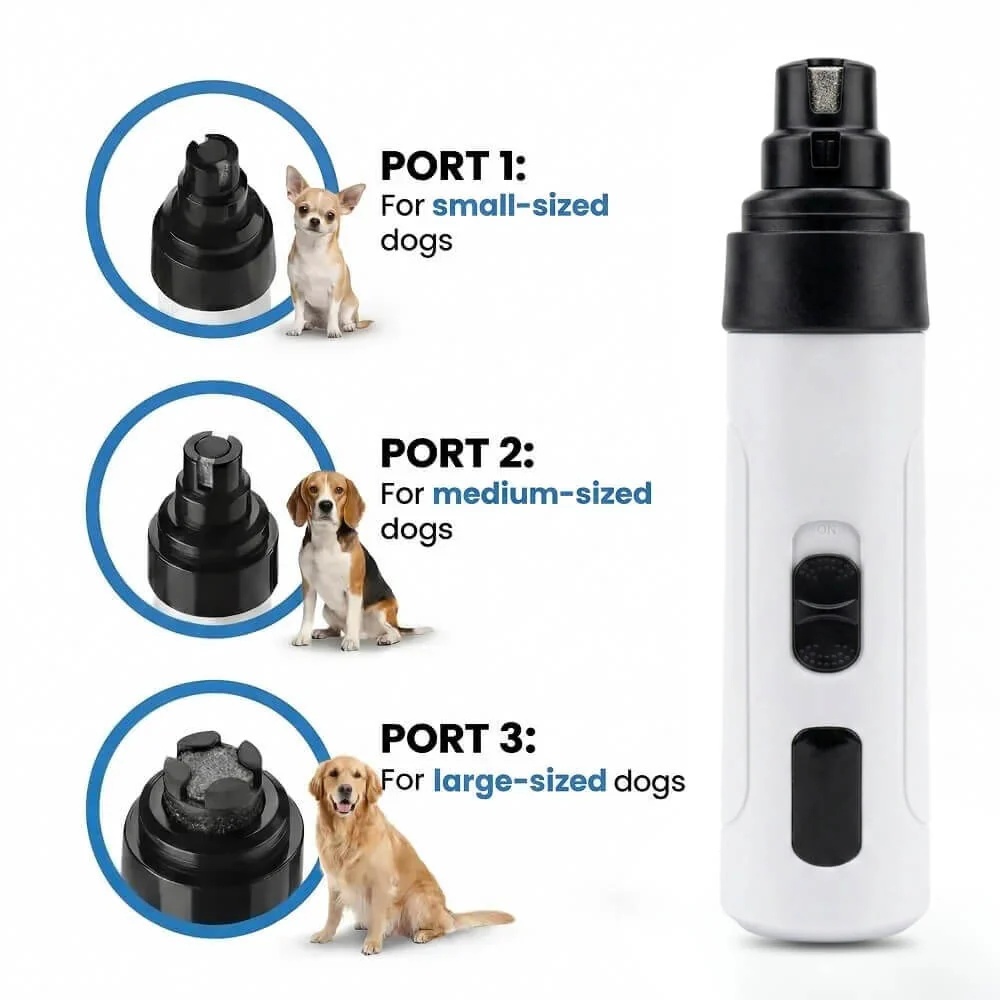
Maxpro 3-in-1 Grinder.
Stress-Free Nail Trimming.
Whisper-quiet DC motor (<40 dB) eliminates fear & discomfort. Features 3 ports, dual speeds, and 7-hour battery life. Safe, precise, and painless.
In This Article
- Step-by-Step Guide: How to master the flashlight trick for dark dog nails.
- Canine Nail Anatomy: Locating the quick to avoid pain and bleeding.
- The Science of Transillumination: Why shining light behind dark claws works.
- Grinding Mechanics: How to use a premium grinder for perfectly smooth finishes.
- Anxiety Management: Tips to soothe and desensitize your beloved pup.
How to Cut Black Dog Nails Using Flashlight Safety Trick: A Step-by-Step Guide

To successfully perform this grooming method, you need a highly focused light source and a patient mindset.
Dark dog claws are dense, meaning standard room light cannot pass through the heavy layers of melanin.
By using concentrated transillumination, you can safely spot the sensitive inner tissue.
Let us look at the exact tools and procedures required for a perfect session.
Prerequisites & Tools You Will Need
Before you begin, ensure you have a high-lumen LED flashlight or a smartphone with a powerful built-in flash.
Keep a supply of high-value treats nearby to reward positive behavior during the session.
Have some styptic powder on hand just in case you accidentally touch the sensitive inner quick.
Finally, prepare a high-quality tool such as a specialized low vibration dog nail grinder to finish the edges safely.
-
Step 1: Set Up a Calming, Dimmed Environment
Find a quiet room in your house away from sudden noises or household distractions.
Dim the overhead lights so that your light source can work with maximum contrast.
Allow your dog to lie down comfortably on a soft blanket or a non-slip grooming mat.
Spend a few minutes petting them gently to lower their heart rate before touching their paws.
-
Step 2: Position the Paw and Isolate the Claw
Gently pick up one paw and hold it firmly but comfortably in your hand.
Use your fingers to separate the toes so that you have clear access to a single claw.
Push back any long paw hair that might block your line of sight or get caught in your tools.
Keep your grip relaxed to prevent your dog from feeling trapped or pulling away instinctively.
-
Step 3: Shine the Flashlight Behind the Claw
Position your bright LED light directly behind the dark claw, shining it forward toward you.
Look closely at the sides of the nail as the light filters through the outer shell.
You should observe a darker, solid shadow near the base of the nail, which is the quick.
The tip of the nail will appear slightly more translucent or hollow under the bright light.
-
Step 4: Mark or Memorize the Safe Trimming Boundary
Note exactly where the dark shadow of the quick ends and the hollow tip begins.
Always plan to trim at least two to three millimeters away from that dark shadow boundary.
If the nail is exceptionally thick, look for the faint ring-like color change on the outer wall.
Having a clear visual target prevents the anxiety of guessing where to make your cut.
-
Step 5: File or Trim in Small, Gradual Increments
Instead of making one massive cut, trim away tiny slivers of the nail at a time.
If you are using high-quality clippers, keep the blade sharp to prevent crushing the nail structure.
Check the cut surface after each pass to look for a small, dark circle forming in the center.
This central dark circle is the outer warning sign that you are approaching the living tissue.
-
Step 6: Smooth and Polish with a Grinder
Finish the process by using a gentle filing tool to round off the sharp outer edges.
Filing reduces the risk of the nail catching on carpets, rugs, or hardwood flooring.
Using a specialized tool helps prevent the painful splitting often caused by heavy manual clippers.
Reward your dog with a tasty treat immediately after finishing each individual paw.
Using the flashlight method is highly effective, but using traditional clippers still carries a risk of sudden slips.
To eliminate this worry completely, we designed the Zenpaw Maxpro Grinder with advanced safety features.
By choosing a electric dog nail clippers alternative like our Maxpro Grinder, you can gradually file the claw with absolute precision.
You can purchase this whisper-quiet, veterinarian-approved solution directly by visiting the Zenpaw Maxpro 3-in-1 Grinder Product Page.
99-Day 100% Money-Back Guarantee
“Ever since we started using the Zenpaw Maxpro Grinder, it’s been such a peaceful experience. It’s very quiet, and my dog actually relaxes. It’s turned our stressful sessions into quick, quiet grooming times.”
— Sarah M. | ✔ Verified Customer
- ✓ Prevents Infection & Splitting
- ✓ Ideal for All Dog Sizes
- ✓ Low-Vibration Technology
- ✓ Fast 2-7 Days Delivery
Need Support? Call 302-307-1000
Understanding Canine Nail Anatomy: Where is the Quick?

To safely care for your dog’s paws, you must understand the basic structure of a canine claw.
The outer layer is made of a tough protein called keratin, which protects the inner structures.
Inside this hard outer shell lies the quick, which is a highly sensitive bundle of nerves and blood vessels.
In light-colored nails, the quick is easy to see because it looks like a pink tube inside the claw.
In dark nails, however, the heavy black pigment completely hides this delicate pink tissue from plain view.
If you cut into the quick, it causes immediate sharp pain and significant bleeding for your pet.
This painful experience can make a dog fear nail grooming sessions for a very long time.
Understanding where this tissue ends is the most critical safety factor in home pet care.
As the claw grows longer, the inner quick also extends further down toward the tip.
Regular, gradual trims help encourage the quick to recede naturally over several weeks.
This gradual recession allows you to keep your dog’s claws at a healthy, comfortable length.
Shining Flashlight Behind Dark Claws: The Science of Transillumination
The flashlight trick is based on a well-established scientific process known as transillumination.
Transillumination involves passing a powerful light beam through body tissues to view internal structures.
While melanin pigments block a lot of light, they are not completely solid to high-intensity beams.
A bright LED light can penetrate the thinner outer edges of the keratin shell quite effectively.
When you shine a light behind the claw, the dense blood vessels in the quick absorb the light rays.
This absorption creates a distinct, dark shadow that marks the start of the sensitive living tissue.
The hollow tip of the nail, which contains no blood flow, allows more light to pass through.
This difference in density creates a visible boundary line right before your eyes.
This visual guide helps remove the stressful guesswork of trimming dark dog claws at home.
Professional groomers have used this helpful illumination trick for decades to keep pets safe.
Now, home groomers can use this same simple method to make nail care stress-free and accurate.
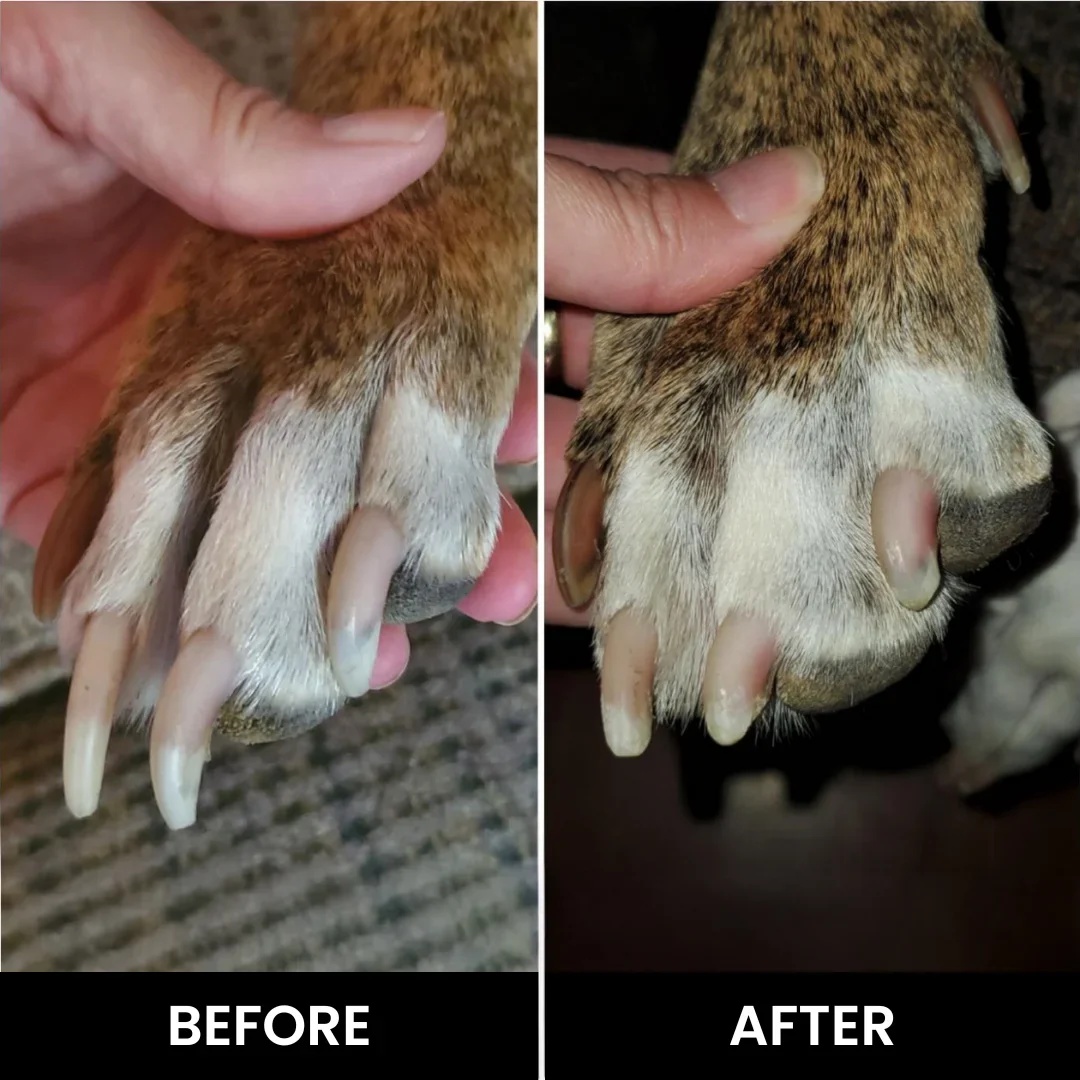
How to Safely Grind Black Dog Nails Without Bleeding
While manual clippers are common, they exert a massive amount of crushing pressure on the nail.
This pressure can cause pain, splitting, or cracking, even if you do not touch the quick directly.
Using a motorized filing tool is a much safer alternative for grooming dark claws.
Filing allows you to wear down the nail structure gradually, millimeter by millimeter.
This slow approach gives you complete control and lets you stop the moment you get close to the quick.
If you notice your dog nails peeling, a grinder can gently smooth out those loose layers without tearing them.
Always hold the filing tool at a comfortable 45-degree angle relative to the growth of the claw.
Apply light, gentle pressure for no more than two to three seconds on each nail at a time.
This brief contact prevents heat from building up, which can cause discomfort for your dog.
Working in short, gentle bursts makes the entire experience much more tolerable for sensitive paws.
The Science of Desensitizing Your Dog to Nail Tools

Many dogs develop intense anxiety around grooming tools due to the loud, harsh noises they make.
To overcome this fear, you need to use a systematic desensitization process.
Start by simply showing the tool to your dog while offering a delicious, high-value reward.
Let them sniff the device while it is turned off so they learn it is not a threat.
Next, turn the device on at a distance so they can get used to the sound without feeling threatened.
If your dog is extremely fearful, you might consider using a natural sedative for dogs to cut nails to help calm their nervous system.
Gently touch the vibration of the running tool to your dog’s leg or shoulder before moving to their paws.
This helps them get accustomed to the physical sensation of the tool in a low-stress way.
Once your dog remains calm, you can proceed to file a single nail and reward them immediately.
Never rush this training process, as building long-term trust is the most important goal.
Our whisper-quiet motor operates under 40 decibels, making this desensitization process much easier.
Overcoming Risks: Trimming Black Nails Safely & Resolving Common Mistakes
One of the most common grooming mistakes is rushing through the process out of sheer nervousness.
When you rush, you are far more likely to slip or cut too deep into the nail.
Another major mistake is using dull manual clippers that crush and fracture the delicate keratin shell.
If a fracture occurs, you must know what to do for a dog’s split nail to prevent painful infections.
Keep a clean container of styptic powder nearby to stop any accidental bleeding quickly.
If you do not have styptic powder, a mixture of cornstarch and baking soda works well in an emergency.
Apply firm, steady pressure with a clean cloth to the tip of the nail for a few minutes.
Remember to stay calm, as your dog can easily sense your anxiety and match your emotional state.
Using a modern, low-vibration filing tool minimizes these risks and keeps the process smooth.
By taking your time and filing in tiny increments, you can avoid painful accidents entirely.
Comparison of Nail Grooming Methods
To help you choose the best approach for your home, we have compared the three most common nail grooming methods.
| Grooming Method | Safety Level for Dark Nails | Anxiety Level for Anxious Dogs | Risk of Splitting Keratin Layers |
|---|---|---|---|
| Traditional Heavy Clippers | Low (High risk of nicking hidden quicks) | High (Loud clicking sounds and crushing force) | High (Prone to cracking dry claws) |
| Flashlight + Sharp Clippers | Medium (Better visibility, but still uses cutting force) | Medium (Still produces a sudden, loud click) | Medium (Depends on blade sharpness and nail density) |
| Zenpaw Whisper-Quiet Grinder | Excellent (Gradual filing with zero cutting force) | Minimal (Whisper-quiet motor is under 40dB) | None (Smooths and polishes edges perfectly) |
Frequently Asked Questions (FAQ)
Is the Zenpaw Grinder safe for very large dog breeds?
Yes, our grinder is designed with three distinct port openings to accommodate pets of all sizes.
The large open port is perfect for thick, heavy claws, while the smaller ports suit tiny toy breeds.
The powerful motor provides consistent torque to file down even the toughest nails quickly.
How long does the battery last on a single charge?
The Zenpaw Maxpro features a long-lasting, USB-rechargeable battery that provides up to seven hours of continuous use.
This long run time means you do not have to worry about the device losing power mid-session.
You can easily recharge the device using any standard USB port or phone charger.
Which speed setting is best for beginners?
We highly recommend starting on the low-speed setting to get your dog used to the tool’s movement.
Once your dog is comfortable, you can switch to the high-speed mode for faster grooming.
The dual-speed design gives you full control depending on your dog’s comfort level.
Does the grinding tip get hot during use?
No, our advanced diamond bit grinding wheels are engineered to prevent rapid heat build-up.
However, we still recommend moving the tool from nail to nail to ensure your dog remains perfectly comfortable.
This simple rotation prevents friction warmth from bothering sensitive paw pads.
What should I do if my dog’s nails are peeling?
If you notice dog nails peeling, it is best to avoid using traditional clippers that can worsen the splits.
Instead, use a gentle filing tool to smooth out the peeling layers and seal the nail edge.
Keep the nails trimmed regularly to prevent them from catching on surfaces and peeling further.
How do I handle a split nail if an accident happens?
If you need to know what to do for a dog’s split nail, start by cleaning the area gently with warm water.
Apply styptic powder to stop any bleeding, and wrap the paw in a clean bandage to protect it.
Consult your veterinarian if the split extends deep into the paw joint or shows signs of infection.
Conclusion: Your Stress-Free Grooming Journey Starts Today
Mastering the flashlight safety trick is an incredible way to protect your dog from the pain of an accidental quick cut.
By understanding your dog’s nail anatomy and using a slow, patient approach, you can transform grooming sessions into a peaceful bonding experience.
Ready to transform nail trimming from a battle into a breeze? Explore the Zenpaw Maxpro 3-in-1 Grinder. Call: 302-307-1000 — our team can help you advise on the best grooming practices and help with any product questions.