I still remember the sheer panic in my golden retriever’s eyes when I accidentally clipped her quick years ago, a heartbreaking moment that made me absolutely dread nail maintenance. Like many pet parents, I turned to the classic dremel 7300 pt dog nail grinder in hopes of finding a safer, pain-free alternative. Today, our team at Zenpaw wants to share how to master this tool while introducing even gentler solutions for your dog’s daily paw health.
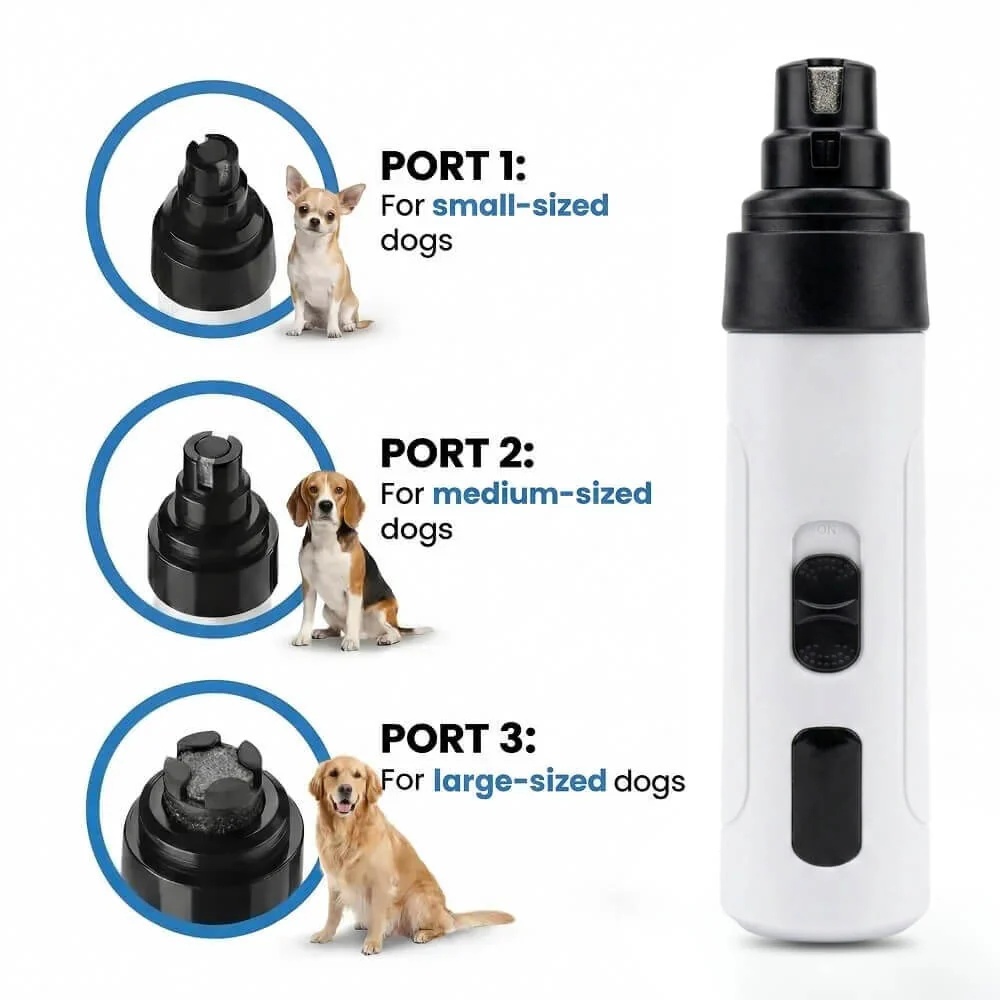
Maxpro 3-in-1 Grinder.
Stress-Free Nail Trimming.
Whisper-quiet DC motor (<40 dB) eliminates fear & discomfort. Features 3 ports, dual speeds, and 7-hour battery life. Safe, precise, and painless.
In This Article
- Getting Started: Comprehensive setup guide for the Dremel 7300-PT assembly and battery unit.
- Nail Anatomy: How to locate the sensitive inner quick on light and dark claws.
- Comparative Analysis: Reviewing the classic Dremel model versus whisper-quiet alternatives.
- Step-by-Step Training: Master desensitization methods and the precise 45-degree grinding angle.
- Safety Measures: Pro tips to prevent painful friction heat and fur snagging risks.
Getting Started with the Dremel 7300 PT Dog Nail Grinder: Assembly, Battery Setup, and Speed Controls
Assembling your new grooming device is the first critical step toward establishing a reliable home nail care routine.
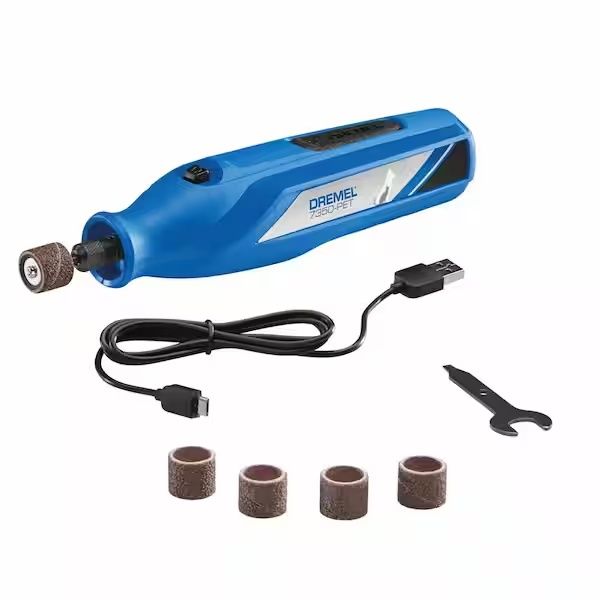
The classic dremel 7300 pt dog & cat nail grinder kit contains several foundational components that you must organize before grooming.
Inside the box, you will find the cordless rotary tool body, a removable 4.8-volt battery pack, a basic wall charger, and a specialized mandrel with sanding bands.
Before attempting to trim any claws, you must charge the battery unit completely to ensure optimal motor output.
To begin, align the plastic grooves on the battery pack with the matching slots inside the wall charger base.
Push the battery pack firmly into the charger until you hear a clear, reassuring metallic click.
Plug the charger into a standard household outlet and allow it to charge uninterrupted for a minimum of three hours.
Once the initial charging cycle completes, remove the battery from the charger and slide it into the bottom recess of your rechargeable 7300-pt pet file.
Next, you must focus on the precise physical process of setting up dremel 7300 unit attachments.
Locate the small, spring-loaded silver shaft lock button situated near the plastic collar of the rotary tool.
Depress and hold this lock button firmly to prevent the internal drive shaft from spinning freely during assembly.
While maintaining firm pressure on the lock button, use the included metal wrench to loosen the collet nut by turning it counter-clockwise.
Insert the thin metal shank of the sanding mandrel directly into the opening of the loosened collet.
Push the mandrel shank inward until the rubber head sits approximately one-eighth of an inch above the collet nut.
Tighten the collet nut clockwise using your fingers first, and then apply a final snug turn with the wrench to lock it in place.
Slide a 60-grit sanding band over the rubber mandrel head until it is completely flush with the rubber edges.
If the sanding band feels loose, tighten the small screw on the very top of the mandrel to expand the rubber drum underneath.
Over several grooming sessions, you will naturally find yourself replacing worn-out grinding drums on Dremel 7300-PT units as the abrasive surface degrades.
An excessively worn sanding band will fail to shape thick claws efficiently and will quickly generate uncomfortable friction heat.
Always remove the battery pack from the tool body before swapping out any active accessories to ensure complete safety.
Finally, locate the sliding speed control switch on the front face of your rotary tool body.
The “LO” setting spins the mandrel at approximately 6,500 RPM, providing a gentle rate of speed ideal for small dogs or detailed finishing work.
The “HI” setting ramps up the rotation to 13,000 RPM, delivering the extra torque necessary to shape thick, dense claws on larger breeds.
We strongly advise starting every session on the low speed setting to evaluate your dog’s physical comfort level and emotional tolerance.
99-Day 100% Money-Back Guarantee
“Ever since we started using the Zenpaw Maxpro Grinder, it’s been such a peaceful experience. It’s very quiet, and my dog actually relaxes. It’s turned our stressful sessions into quick, quiet grooming times.”
— Sarah M. | ✔ Verified Customer
- ✓ Prevents Infection & Splitting
- ✓ Ideal for All Dog Sizes
- ✓ Low-Vibration Technology
- ✓ Fast 2-7 Days Delivery
Need Support? Call 302-307-1000
Understanding Canine Nail Anatomy: Navigating the Delicate Quick Safely
To groom your dog successfully, you must first master the delicate inner structures of the canine claw.
Every single claw contains a living, highly vascularized center called the quick.
The quick is packed with sensitive nerve endings and active blood vessels that supply oxygen to the growing nail shell.
If you accidentally penetrate or nick this area, your dog will experience a sharp sting followed by immediate bleeding.
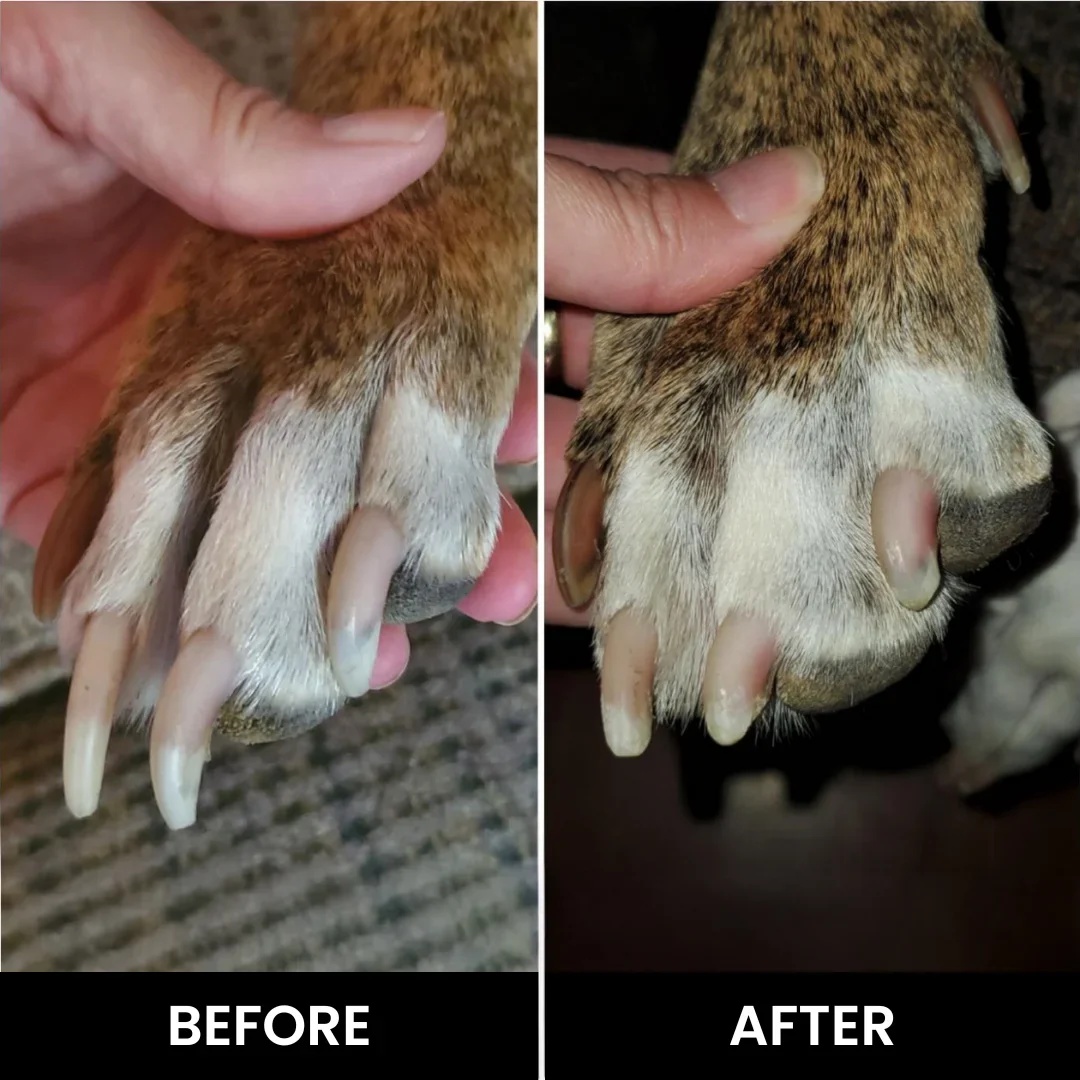
According to expert observations from the American Kennel Club, keeping nails short is vital for long-term joint health.
When a dog’s nails grow long enough to touch the ground continually, they push the toe bones upward into abnormal angles.
This structural shift alters the natural alignment of the leg and increases strain on your pet’s spinal column over time.
Fortunately, finding the quick is quite straightforward on dogs with light-colored or white claws.
Look at a white claw from the side to see a soft, pink shadow extending from the toe toward the middle of the nail.
This pink zone represents the active blood flow, which means you should stop your work at least two millimeters before reaching it.
However, black or darkly pigmented claws present a significantly higher challenge for most pet parents.
Dark claws completely obscure the pink quick, making it impossible to see the blood supply from a side profile.
To handle dark nails safely, you must work in extremely gradual, millimeter-sized increments.
After each brief pass of the rotating band, look directly at the exposed tip of the claw head-on.
Initially, you will only see a dry, uniform white or chalky grey powdery texture across the cut surface.
As you file closer to the living tissue, a small, dark, moist-looking circular dot will appear in the very center of the nail.
This moist central circle is the outer safety wall of the quick, indicating that you must stop filing immediately.
If you accidentally shave too deep, always keep a container of kwik stop dog nails styptic powder open and ready on your table.
Applying this powder to the bleeding tip with moderate pressure stops active bleeding in just a few seconds.
Learning these physical signs is a cornerstone of professional dog nail clippers safety protocols.
By working gradually, you can comfortably shape your pet’s nails without ever triggering their natural fear response.
Dremel 7300-PT Review: Performance, Noise Levels, and Modern Alternatives
The classic dremel 7300 pt dog nail grinder has remained a staple in many home grooming setups for over a decade.
It offers a highly durable housing and the reliable build quality that consumers expect from a legacy hardware brand.
However, specialized pet grooming technology has advanced tremendously since the introduction of this early model.
One of the most common issues reported by pet parents using the older rechargeable 7300-pt pet file is the high volume of operating noise.
The internal brushed motor produces a mechanical buzz that registers well over 65 decibels during use.
This loud sound can easily startle sensitive pets, causing them to pull away or panic before you even touch their paws.
Additionally, the older Nickel-Cadmium battery pack is prone to “memory effect,” meaning it holds less charge over months of ownership.
As the battery charge drops, the rotation speed slows down significantly, which can cause the tool to grab or snag on dense claws.
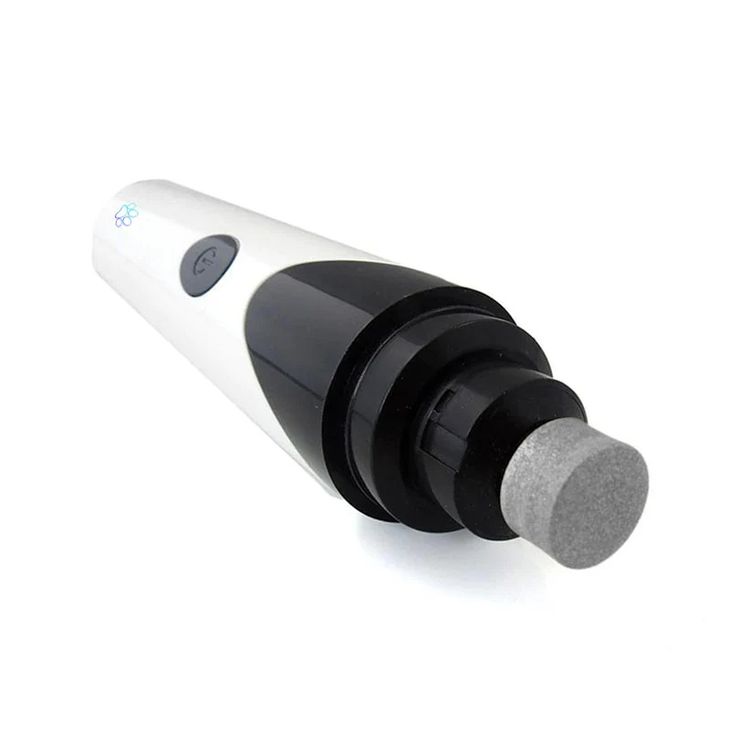
If your dog exhibits high levels of grooming anxiety, a modern silent dog nail grinder represents a much more comfortable alternative.
Contemporary grooming devices utilize quiet brushless motors that operate at ultra-low decibels to preserve your pet’s calm demeanor.
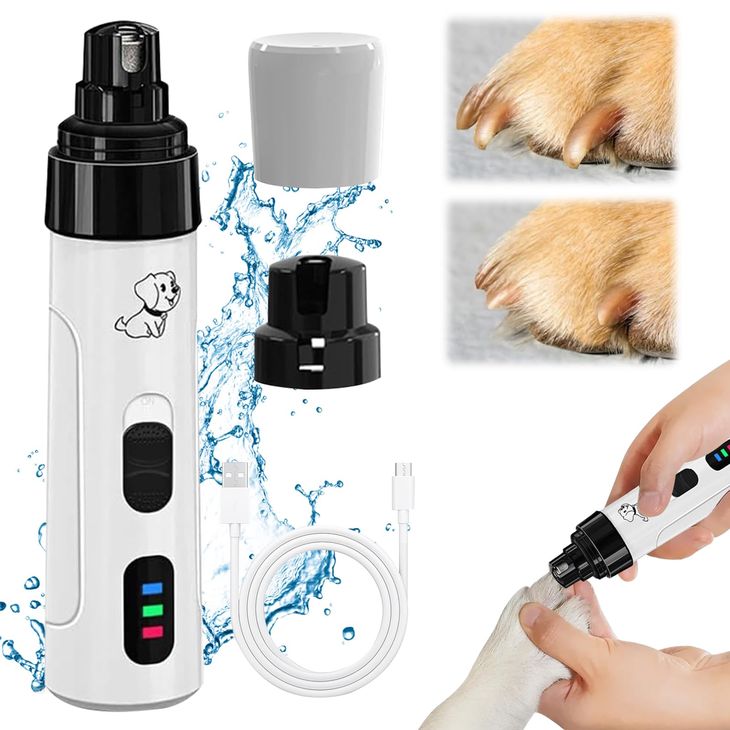
At Team Zenpaw, we engineered our Maxpro 3-in-1 Grinder with a whisper-quiet motor running under 40 decibels to remove stress from the experience entirely.
The Maxpro model is built with a lightweight, ergonomic body that reduces hand fatigue during long, detailed sessions.
It also runs on a modern Lithium-Ion battery that provides up to seven hours of reliable performance on a single USB charge.
Some dog owners prefer the convenience of a hybrid dog nail clipper with light and grinder to manage overgrown lengths before smoothing the edges.
However, a dedicated, low-vibration rotary file remains the safest way to maintain a round, smooth finish on all breeds.
When selecting a tool, you must weigh the heavy feel and loud motor of traditional rotary tools against modern quiet tools.
Our ultimate goal is to convert a potentially stressful chore into a calm, gentle bonding moment with your companion.
The Step-by-Step Guide to Stress-Free Dog Nail Grinding
Teaching an anxious dog to accept a rotary nail file requires a patient, highly methodical approach.
You should never rush your pet into a full trimming session on the very first day you open the box.
Begin by placing the powered-off tool on the floor and letting your dog sniff it freely.
Place high-value snacks and kibble around the device so they form a positive association with its physical presence.
Once they remain completely relaxed, lift the tool and turn on the motor at its lowest speed setting while keeping it several feet away.
Feed your dog premium chicken bites or dried liver while the machine hums to teach them that the sound predicts good things.
Repeat this auditory practice for several days until your dog actively wags their tail when they hear the motor start.
Next, gently press the vibrating handle of the active tool against your dog’s leg or shoulder without touching their claws.
This step allows them to experience the physical sensation of vibration in a completely non-threatening manner.
When you are ready to begin filing, sit in a brightly lit room and hold your dog’s paw securely but gently in your hand.
Use your fingers to push back any surrounding fur to isolate a single toe clearly.
Hold the rotary tool near the collar with your dominant hand, similar to holding a thick drawing pencil.
Approach the tip of the claw at a clear 45-degree angle to match the natural downward growth slope of the nail.
Apply extremely light, gentle pressure and limit contact with the nail to a maximum of two seconds per touch.
Using brief, sweeping strokes prevents friction heat from building up and causing discomfort to the nail bed.
For tiny toy breeds, some owners find that small manual small animal nail clippers provide excellent initial control.
However, finishing the edges with a quiet rotary file is the best way to prevent snags and split nails on household fabrics.
Always praise your dog warmly and offer a delicious reward after you complete each individual nail.
By keeping your sessions short and positive, your dog will quickly learn to sit calmly during their routine paw care.
Crucial Safety Measures: Preventing Heat, Hair Snags, and Over-Grinding
Even highly experienced pet owners can occasionally overlook simple safety precautions during home grooming.
The most common mistake is holding the rotating sander against a single claw for an extended duration.
Friction from the spinning band creates intense heat that can pass through the hard nail wall rapidly.
This thermal build-up can easily irritate the sensitive quick, causing your dog to pull their paw away in sudden pain.
To prevent this issue, you must rotate your work across three or four different claws in a continuous cycle.
This rotation pattern gives each individual claw several seconds to cool down completely before receiving another pass.
Another major safety risk is long paw hair wrapping around the rotating shaft of the tool.
To prevent painful hair pulling, pull a clean, old nylon stocking over your dog’s paw before you begin.
Gently push the nails through the fine mesh fabric so they are exposed while the long fur is flattened safely behind the stocking.
This simple professional trick completely isolates the nail and keeps loose hairs clear of the spinning collet.
Additionally, avoid using old, dull clippers that crush the claw structure with blunt force.
Crushing forces can create microscopic cracks along the nail plate that allow environmental bacteria to enter.
A premium, high-speed rotary file allows for gradual, painless shaping that preserves the natural strength of the claw.
Always inspect the surface of your sanding drum before starting to ensure the grit is clean and effective.
By applying these simple expert tips, you can guarantee a safe, comfortable, and highly successful home grooming experience.
Grinder Comparison: Zenpaw Maxpro vs. Dremel 7300-PT
To help you select the most suitable tool for your household, we have prepared a direct comparison of these two models.
| Feature Checklist | Dremel 7300-PT | Zenpaw Maxpro 3-in-1 |
|---|---|---|
| Operating Noise Level | Loud (approx. 65-70 dB) | Whisper-Quiet (<40 dB) |
| Battery Technology | NiCd (Memory effect prone) | Lithium-Ion (7-Hour run time) |
| Device Weight | Heavy (approx. 9.1 oz) | Lightweight (approx. 4.2 oz) |
| Safety Cover Guard | Sold separately | Included (3-Port sizing guard) |
| Recharging Port | Bulky wall charging stand | Universal USB Cable |
Frequently Asked Questions About Dog Nail Grinding
Conclusion: A Peaceful Path to Complete Paw Wellness
By shifting from loud, historical rotary devices to modern whisper-quiet engineering, you can transform a once-stressful chore into a tranquil, positive bonding routine for your pet.
Ready to transform nail trimming from a battle into a breeze? Explore the Zenpaw Maxpro 3-in-1 Grinder. Call: 302-307-1000 — our team can help you advise on the best grooming practices and help with any product questions.