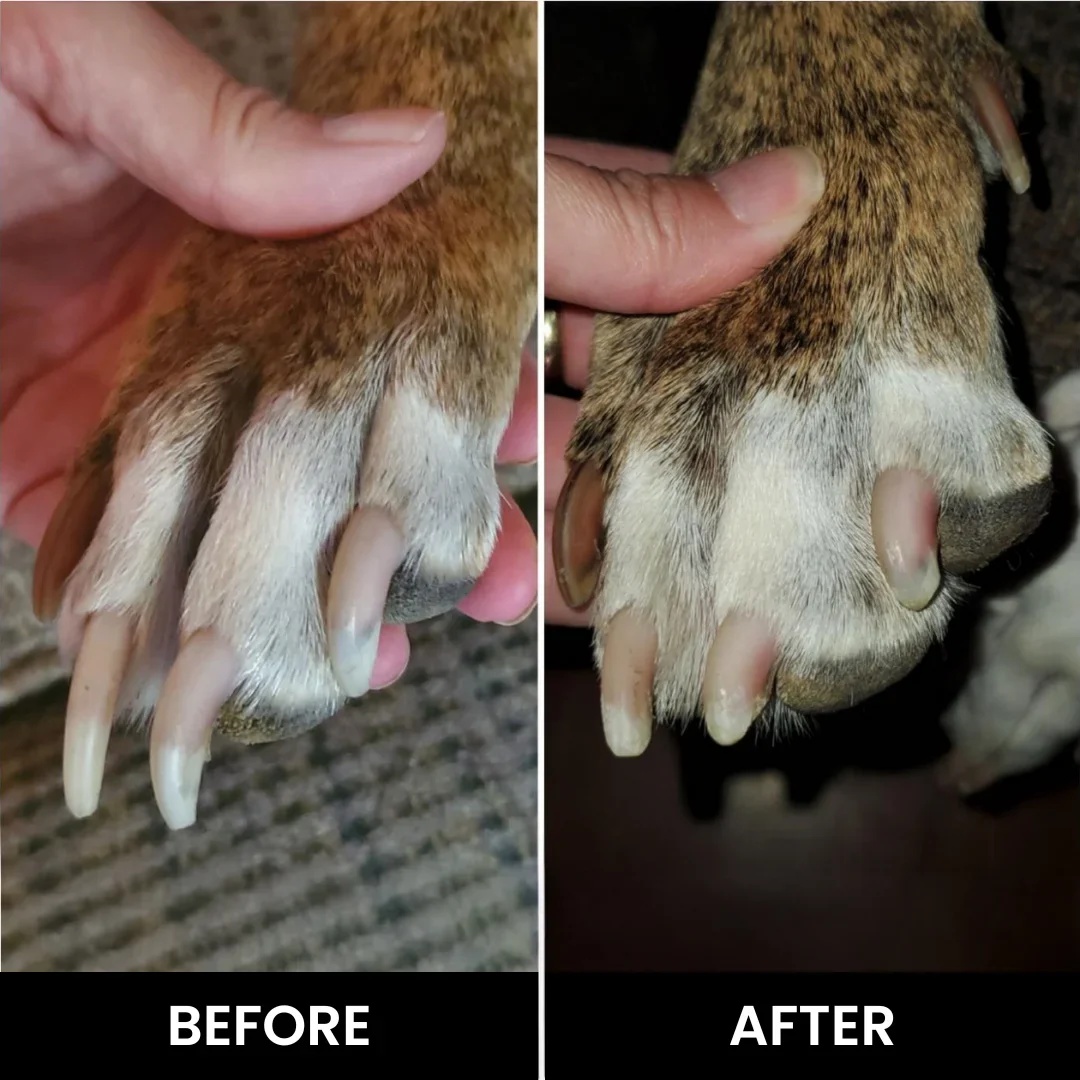
I still remember the panic when I nicked my golden retriever’s quick during a home trim, her sharp yelp breaking my heart. That traumatic afternoon set me on a professional mission to master canine paw health and find a stress-free solution. Today, learning how to trim dog’s nails at home does not have to be a battle, and with the whisper-quiet Zenpaw Maxpro 3-in-1 Grinder, you can safely protect your pet’s paws.
Maxpro 3-in-1 Grinder.
Stress-Free Nail Trimming.
Whisper-quiet DC motor (<40 dB) eliminates fear & discomfort. Features 3 ports, dual speeds, and 7-hour battery life. Safe, precise, and painless.
In This Article
- Step-by-Step Grooming Guide: A comprehensive breakdown of how to prepare, trim, and polish your dog’s claws at home.
- Canine Nail Anatomy: Deep-dive anatomical insights to help you identify the quick on both light and dark nails.
- Behavioral Desensitization: Science-backed methods to eliminate grooming anxiety and build cooperative trust.
- Practical Grinding Techniques: How to hold paws and use correct angles to get a professional finish.
How to Achieve a Safe Dog Nail Trim: A Step-by-Step Guide

Before you begin, ensure you have gathered all necessary tools and that your pet is resting in a calm state.
Having a high-quality trimmer, clotting powder, and delicious reward treats ready will set you up for a smooth process.
-
Step 1: Set Up a Quiet, Distraction-Free Grooming Area
The physical environment plays a critical role in how your dog reacts to nail grooming.
Choose a quiet, peaceful room in your home where your pet already feels safe and comfortable.
Keep other household pets and small children in another room to avoid sudden distractions.
Close the windows and doors to shut out any startling outdoor noises.
Place a thick, non-slip mat or a soft towel on the surface where your dog will be resting.
This stable footing prevents your dog from slipping, which can trigger sudden panic.
Sit at your dog’s eye level to maintain a reassuring and non-threatening physical posture.
Place all your grooming supplies and high-value rewards within easy reach before you begin.
Having everything prepared beforehand prevents you from needing to disrupt a calm moment to search for tools.
Taking these steps to prepare your workspace creates a solid foundation for a peaceful experience.
-
Step 2: Gently Hold and Examine Your Dog’s Paws
Before introducing any tools, you must get your dog comfortable with physical contact on their paws.
Sit close to your pet and talk to them in a soft, soothing tone of voice.
Take one of their front paws gently in your hand, keeping your grip relaxed but secure.
Massage their toes and the sensitive areas between their paw pads for a few seconds.
If your dog pulls their paw away, do not hold on tightly or force them to stay.
Simply release the paw, reward them with a treat for staying calm, and try again a moment later.
This cooperative approach teaches your pet that they have control and do not need to fight you.
Separate each individual toe gently to inspect the claws for any signs of cracking or splitting.
Check the surrounding skin for redness, swelling, or irritating debris like thorns or burrs.
Getting your dog accustomed to regular paw handling makes the actual trimming process significantly smoother.
-
Step 3: Locate the Quick Before Making Any Cuts
Identifying the boundaries of the quick is the most critical safety step in the grooming process.
The quick is the vascular inner core of the claw that contains sensitive nerves and blood vessels.
On dogs with light-colored or translucent claws, the quick is easy to see as a soft pink zone.
You should always aim to cut or grind at least two millimeters away from this pink line.
On dark or black claws, the quick is completely hidden from view from the outside.
For these dogs, you must look directly at the very tip of the nail to guide your work safely.
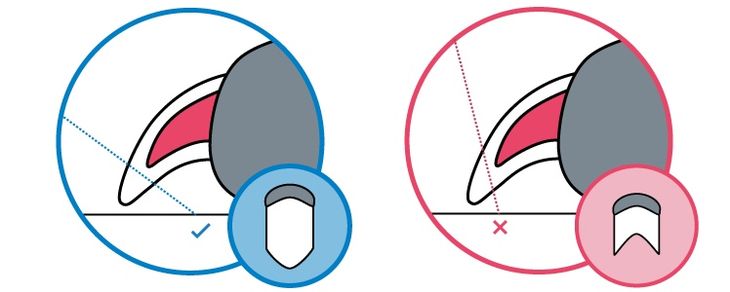
Examine the claw from multiple angles to estimate where the natural curve of the nail begins to bend.
The quick rarely extends past the point where the nail curve starts to point downward toward the floor.
Understanding this basic anatomical boundary helps prevent accidental injury and keeps your dog safe.
Taking a few moments to locate this safe zone builds the confidence you need to trim without fear.
-
Step 4: Position Your Tool and Trim at a Safe Angle
Once you are ready to trim, hold your grooming tool firmly in your dominant hand.
Hold your dog’s paw securely with your non-dominant hand, using your thumb to extend the specific toe.
Position your clippers or grinder at a clean 45-degree angle relative to the nail’s growth.
This precise angle ensures that you do not cut too close to the sensitive quick.
If you are using clippers, make small, shallow cuts rather than one large, aggressive chop.
If you are using a quiet grinder, apply the rotating wheel in brief, two-second intervals.
This gentle approach prevents friction heat from building up on the sensitive nail beds.
Always support your dog’s leg close to their body to avoid placing uncomfortable pressure on their joints.
Take your time and complete just one or two nails at a time if your pet seems nervous.
Slow, precise movements ensure a safe outcome and prevent accidental slips or injuries.
-
Step 5: Smooth the Edges and Reward Your Dog
After completing the trim, you must smooth away any remaining sharp or jagged edges.
Rough nail edges can easily snag on carpets, furniture, or outdoor grass, causing painful tears.
Use your grinding tool or a fine-grit manual file to polish the edges of each cut claw.
Work gently around the sides and the top of the nail to create a smooth, rounded finish.
Apply a tiny amount of moisturizing paw balm to soothe and protect the freshly trimmed claws.
Once the grooming session is finished, shower your dog with enthusiastic praise and high-value rewards.
Celebrate their cooperation with their favorite game, a fun walk, or a special long-lasting treat.
This positive ending helps your pet associate nail grooming with wonderful outcomes instead of fear.
Clean your grooming tools thoroughly and store them in a dry, safe place for future sessions.
Building this positive routine ensures that your next grooming day will be even easier and more comfortable.
To make this at-home routine incredibly simple, we recommend using a tool designed specifically for anxious pets.
The Maxpro 3-in-1 Grinder operates with a whisper-quiet motor and extremely low vibration to keep your dog perfectly relaxed.
99-Day 100% Money-Back Guarantee
“Ever since we started using the Zenpaw Maxpro Grinder, it’s been such a peaceful experience. It’s very quiet, and my dog actually relaxes. It’s turned our stressful sessions into quick, quiet grooming times.”
— Sarah M. | ✔ Verified Customer
- ✓ Prevents Infection & Splitting
- ✓ Ideal for All Dog Sizes
- ✓ Low-Vibration Technology
- ✓ Fast 2-7 Days Delivery
Need Support? Call 302-307-1000
Understanding Canine Nail Anatomy: Where is the Quick?
Every dog claw consists of two distinct physical layers.
The outer layer is called the unguis, which is a hard shell composed of keratin proteins.
Underneath this hard shell lies the subunguis, which is a softer layer that supports the nail’s structure.
Inside the center of the claw is the quick, a highly sensitive area containing active blood vessels and nerves.
This vascular core is responsible for supplying nourishment to the growing nail.
If you cut into this sensitive tissue, your dog will experience sudden, sharp pain and moderate bleeding.
When a dog’s nails are left to grow too long without regular maintenance, the quick actually grows longer as well.
This elongation makes it much harder to trim the claw back to a safe, healthy length.
Fortunately, consistent grooming causes the quick to naturally recede over time.
Using traditional best canine nail clippers can make identifying this boundary quite difficult.
Professional groomers recommend trimming tiny amounts frequently to encourage the quick to retreat safely.
This anatomical fact is why gradual filing is far safer than making single, aggressive cuts.
By slowly removing thin layers of keratin, you can maintain short nails without risking injury.
How to Safely Grind Black Dog Nails Without Bleeding
Grooming dark claws is widely considered one of the most challenging tasks for pet parents.
Since the dark pigment masks the pink inner quick, finding the safe cutting limit is highly difficult.
To handle dark nails safely, you must change your visual perspective entirely.
Instead of looking at the claw from the side, you should look directly at the cut surface of the tip.
Shine a high-intensity flashlight directly behind the nail to see if you can detect any shadows.
When using dog toe nail grinders, work in brief, gentle taps rather than long, continuous pressure.
After each pass with your grinder, inspect the flat circular face of the nail tip.
At first, you will see a dry, chalky white material in the center of the cut area.
This chalky residue indicates that you are still working safely within the dead outer layers of the nail.
As you get closer to the living tissue, the center of the nail will shift to a darker, moist texture.
This dark spot is the outer protective wall of the quick.
You must stop grinding immediately when you detect this small, dark circle forming.
Taking a cautious approach ensures that your pet stays comfortable and completely pain-free.
The Science of Desensitizing Your Dog to Nail Tools
Many dogs develop a strong aversion to grooming tools due to the loud noises and heavy vibrations.
To overcome this fear, you should apply systematic desensitization techniques over several short sessions.
Start by leaving your nail maintenance tools on the floor next to your dog’s favorite treats.
Allow your dog to investigate and sniff the equipment at their own comfortable pace.
Reward every positive interaction with enthusiastic praise and a delicious reward.
Once your pet is comfortable, hold the tool and turn it on at a safe distance.
Our professional grooming team designed the Zenpaw Maxpro to operate under a whisper-quiet 40 decibels to minimize startle responses.
Feed your dog high-value treats while the motor runs to build a happy, positive association.
Slowly move the running device closer to your pet’s body over the course of several days.
Eventually, touch the non-vibrating end of the tool to their leg so they get used to the physical contact.
Progress to touching their paws, rewarding them generously after every successful step.
This slow, patient progression builds a deep foundation of trust and prevents grooming anxiety from escalating.
If you need a temporary solution while training, you might consider using rubber dog nail covers to protect your floors.
Practical Application Guide: Grinding at a 45-Degree Angle

Achieving a smooth, clean finish requires holding your tool at the correct physical angle.
Professional groomers always recommend aligning your grinding wheel at a precise 45-degree angle.
This specific angle mimics the natural wear pattern of wild canines running on rough terrain.
Gently support your dog’s leg, keeping their joints in a natural, relaxed position.
Hold the individual toe firmly between your thumb and index finger to prevent sudden twists.
Apply the spinning wheel to the nail tip for no more than two seconds per touch.
This rapid technique prevents thermal friction from heating up the sensitive living tissues.
If you hold a grinder in one spot for too long, the heat can cause sudden pain even without touching the quick.
Alternate between different claws to allow each nail bed to cool down completely.
For dogs with exceptionally long claws, you can use high-quality plier style dog nail clippers to remove the bulk first.
Follow up immediately with your quiet grinder to polish away any jagged edges or sharp points.
Overcoming Risks and Common Grooming Mistakes
Using outdated or dull tools is one of the most common mistakes made by home groomers.
Traditional clippers can easily bend, crack, or split the claw if the blades are worn out.
This sudden crushing action can split the nail upward into the living tissue, causing severe discomfort.
To avoid this painful risk, always choose professional nail clippers for dogs with surgical-grade steel.
Another major error is rushing through a grooming session when your dog is showing signs of distress.
Forcing your pet to submit to grooming only reinforces their anxiety and makes future sessions much harder.
If your dog begins to struggle or whine, pause the session immediately and try again when they are calm.
Modern tools like the Zenpaw Maxpro are specifically engineered to eliminate these painful risks.
Its smooth, rotating action files away the nail gradually without applying any crushing force.
This reliable control ensures that both you and your pet remain completely relaxed from start to finish.
| Grooming Method | Quick Injury Risk | Anxiety / Vibration Level |
|---|---|---|
| Traditional Metal Clippers | High Risk | High (Crushing Noise) |
| Zenpaw Maxpro Grinder | Extremely Low | Whisper-Quiet (<40dB) |
| Manual Hand Files | Low Risk | Medium (Slow & Tedious) |
Frequently Asked Questions About At-Home Dog Nail Care
Is the Zenpaw Grinder safe for large dogs?
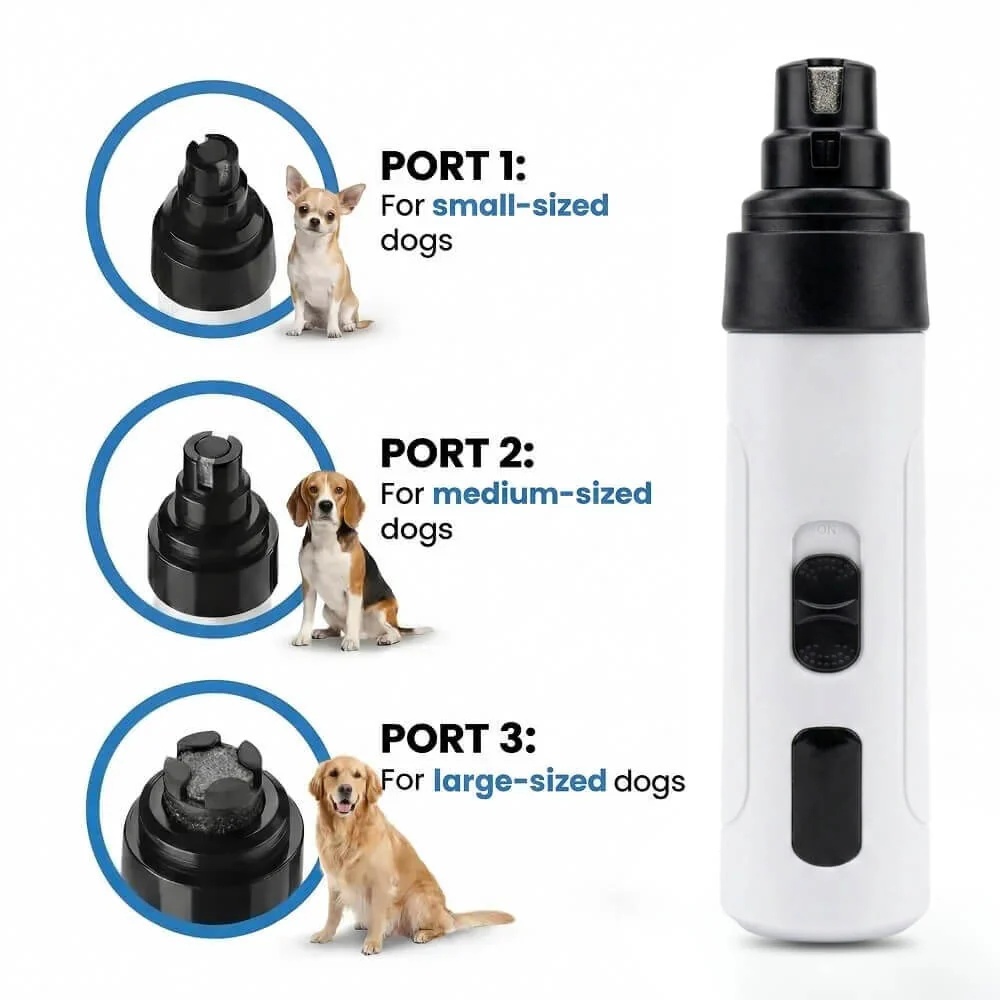
Yes, the Zenpaw Maxpro is fully equipped to handle all breeds and sizes.
It features three distinct ports designed to accommodate small, medium, and large claws.
The heavy-duty brass spindle provides plenty of torque for thick, stubborn nails.
You can easily adjust the settings to match your dog’s specific needs.
How long does the battery last on a single charge?
The built-in lithium-ion battery provides up to seven hours of continuous runtime.
It charges quickly using any standard USB port or power adapter.
This long-lasting battery life means you rarely have to worry about running out of power.
You can easily groom multiple pets without needing to pause for a recharge.
Which speed setting is best for my anxious dog?
We always recommend starting on the lowest speed setting during initial training.
The low speed produces the quietest sound and minimal vibration for sensitive paws.
Once your dog is comfortable, you can switch to the high-speed setting for faster results.
This dual-speed versatility gives you complete control over the grooming experience.
Does the grinding wheel get hot during extended use?
No, our advanced cooling technology prevents the head from overheating.
The low-heat design protects your pet’s claws from painful thermal transfer.
However, you should still avoid holding the tool on a single nail for more than two seconds.
Moving from claw to claw ensures a perfectly safe, cool, and comfortable session.
What should I do if I accidentally make the quick bleed?
First, remain completely calm so you do not transfer your panic to your pet.
Apply a small pinch of styptic powder directly to the bleeding tip of the nail.
Hold firm pressure against the claw for roughly thirty seconds until the bleeding stops.
If you do not have styptic powder, clean cornstarch or baking soda can work in a pinch.
Give your dog a comforting hug and a delicious treat to soothe their feelings.
How often should I groom my dog’s nails at home?
Most dogs require a nail trim every two to four weeks to maintain optimal health.
If you can hear their claws clicking on your hard floors, they are definitely too long.
Regular maintenance keeps the quick short and prevents painful postural imbalances.
Consistently grooming small amounts is much easier than tackling severely overgrown claws.
Embrace Stress-Free Paw Care Today
Ready to transform nail trimming from a battle into a breeze?
Explore the Zenpaw Maxpro 3-in-1 Grinder today.
Call: 302-307-1000 — our team can help you advise on the best grooming practices and help with any product questions.