My heart completely shattered the moment my sweet dog shrieked in pain when I accidentally clipped his nail quick. That traumatic, bloody afternoon sent me on a desperate search for a gentler alternative, which led me directly to trimming dog nails with sandpaper. While manual filing offered a temporary, pain-free respite, it was the discovery of a whisper-quiet electric grinder that truly transformed our stressful grooming sessions into a peaceful bonding experience.
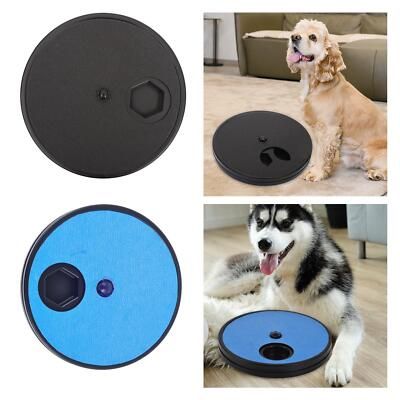
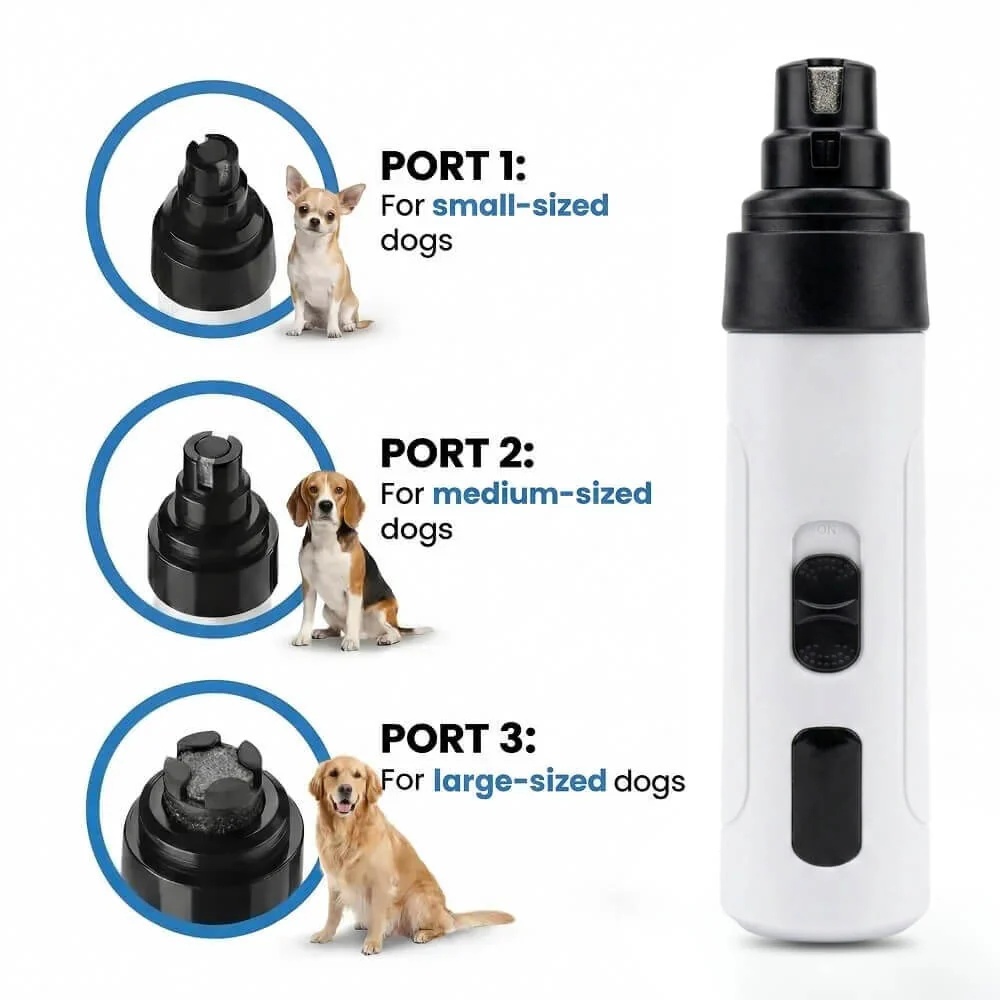
Maxpro 3-in-1 Grinder.
Stress-Free Nail Trimming.
Whisper-quiet DC motor (<40 dB) eliminates fear & discomfort. Features 3 ports, dual speeds, and 7-hour battery life. Safe, precise, and painless.
In This Article
- How to build and use a DIY scratch board safely at home.
- Step-by-step instructions for manual sandpaper grooming techniques.
- Anatomy of the canine nail and how to completely avoid injuring the quick.
- How to transition your dog to an automated, whisper-quiet electric nail grinder.
- Expert solutions to common DIY scratching hazards and mistakes.
How to File Your Dog’s Nails with Sandpaper: A Safe Step-by-Step Guide
Filing your canine companion’s claws manually with sandpaper is an incredibly gentle way to maintain paw wellness.
This technique is especially helpful for dogs that develop severe anxiety around traditional metal clippers.
To successfully perform this stress-free routine, you must first gather a few basic household supplies.
You will need several sheets of high-quality adhesive sandpaper, a sturdy flat wooden board, a roll of double-sided mounting tape, and plenty of high-value training treats.
Ensure that you perform the grooming session in a quiet, distraction-free environment where your dog feels completely secure.
-
Step 1: Choose the Ideal Sandpaper Grit Size
Selecting the correct paper grit is absolutely essential to ensure efficiency without causing raw skin.
For large dog breeds with incredibly thick claws, we recommend starting with a coarse 80-grit sandpaper sheet.
Medium-sized dogs with moderate nail thickness respond best to a balanced 120-grit abrasive surface.
If you own a small toy breed or a puppy, a gentler 150-grit or 180-grit paper is highly recommended.
Using a grit that is too fine will only generate excessive friction heat without actually reducing the length of the nail.
-
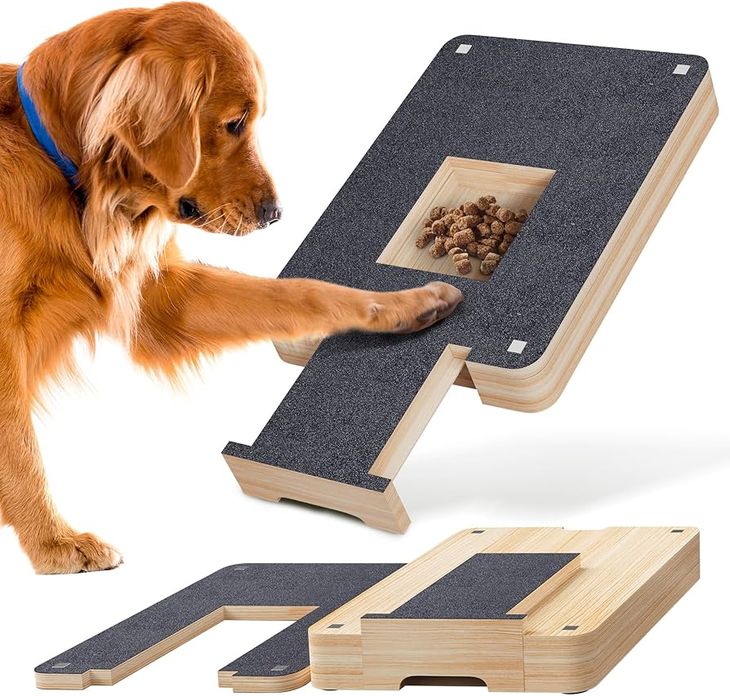
Step 2: Construct a Heavy-Duty Dog Scratch Board
Take a flat wooden board measuring approximately two feet long by one foot wide to serve as your base.
Apply strips of heavy-duty double-sided tape horizontally across the entire surface of the wood.
Carefully press your selected sheets of sandpaper onto the tape, ensuring all edges are perfectly flat.
Smoothing out any air bubbles prevents the paper from tearing or sliding when your pet begins to scratch.
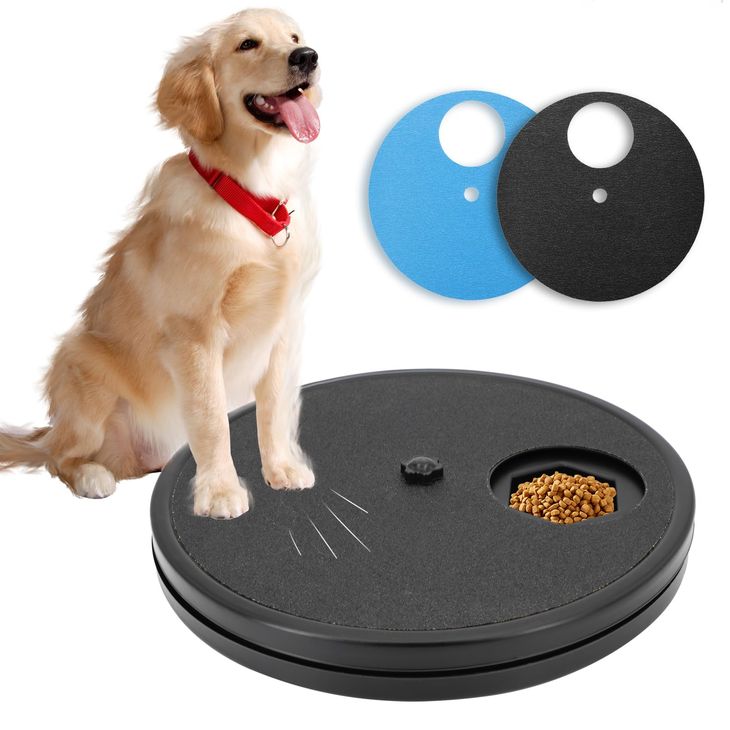
This simple DIY tool is structurally identical to a professional best dog nail scratch board used by positive-reinforcement trainers.
-
Step 3: Introduce the Abrasive Surface Slowly
Place the newly constructed scratching board flat on the living room floor and allow your dog to investigate it.
Scatter some of their absolute favorite high-value treats directly onto the rough sandpaper surface.
Let your dog sniff the board and carefully lick up the treats at their own comfortable pace.
Praise your dog with a happy, warm tone of voice whenever they touch the board with their paws.
This introductory step builds a strong mental association between the unique sandpaper texture and wonderful rewards.
-
Step 4: Train Your Dog to Scratch the Board
Hold a highly fragrant treat in your closed fist and place your hand directly behind the angled board.
Your dog’s natural curiosity and desire for the treat will prompt them to scrape their paw against the wood.
The very instant their claws make contact with the sandpaper, mark the behavior with a clicker or a enthusiastic “Yes!” word.
Immediately open your hand and reward them with the treat to reinforce that exact physical movement.
Practice this interactive exercise in very brief, positive sessions lasting only three to five minutes daily.
-
Step 5: Manually File the Dewclaws with Soft Emery Paper
While a flat board works beautifully for front nails, it cannot physically reach the elevated dewclaws.
To safely shorten these side claws, you must hold a loose piece of sandpaper or an emery board in your hand.
Grasp your dog’s leg gently but firmly to stabilize the individual toe you wish to groom.
Swipe the sandpaper in a single downward motion away from the leg rather than moving back and forth.
This gentle manual method is highly effective, but it is physically demanding to execute on all four paws regularly.
While building a DIY scratching board is a fantastic way to introduce your pet to nail care, manual filing can quickly become exhausting for your wrists.
To achieve professional, perfectly rounded results in a fraction of the time, we highly recommend upgrading to the Zenpaw Maxpro Grinder.
This automated, whisper-quiet device takes the physical labor out of grooming while remaining incredibly gentle on your pet’s sensitive paws.
You can seamlessly transition your dog from the scratch board to this stress-free tool by visiting the Zenpaw Maxpro 3-in-1 Grinder product page today.
99-Day 100% Money-Back Guarantee
“Ever since we started using the Zenpaw Maxpro Grinder, it’s been such a peaceful experience. It’s very quiet, and my dog actually relaxes. It’s turned our stressful sessions into quick, quiet grooming times.”
— Sarah M. | ✔ Verified Customer
- ✓ Prevents Infection & Splitting
- ✓ Ideal for All Dog Sizes
- ✓ Low-Vibration Technology
- ✓ Fast 2-7 Days Delivery
Need Support? Call 302-307-1000
Can I File My Dog’s Nails with an Emery Board or Sandpaper?
Many concerned pet parents often wonder: can i file my dogs nails with sandpaper or a standard beauty file?
The short answer is yes, you can absolutely use these tools to smooth down rough claw edges.
However, you must realize that a human emery board is structurally designed for thin, soft human nails.
A dog’s claw is composed of dense, incredibly tough keratin that will instantly wear down a standard cardboard file.
If you attempt to perform emery board filing for dog claws manually, it will take hours of intense physical labor to see any visual change.
This is why industrial-grade sandpaper or professional canine equipment is far more practical for maintaining paw health.
Using a manual filing technique is best reserved as a finishing step to eliminate sharp snags after a primary trim.
The Science of Canine Nail Anatomy: Understanding the Sensitive Quick
Before you begin to file dog’s nails with sandpaper, you must understand the internal structure of the claw.
Every single canine nail contains a highly vascular, sensitive inner core known as the quick.
This living tissue is packed with active blood vessels and extremely sensitive nerve endings.
If you file too deeply into this region, you will break the blood vessel and cause your dog sudden, intense pain.
When grooming dark or black claws, finding this boundary is incredibly difficult because you cannot see through the dark pigment.
To prepare for any accidental nicks, you must always keep a tub of kwik stop dog nails powder within arm’s reach.
This clinical styptic powder instantly stops bleeding by sealing the blood vessel and numbing the area.
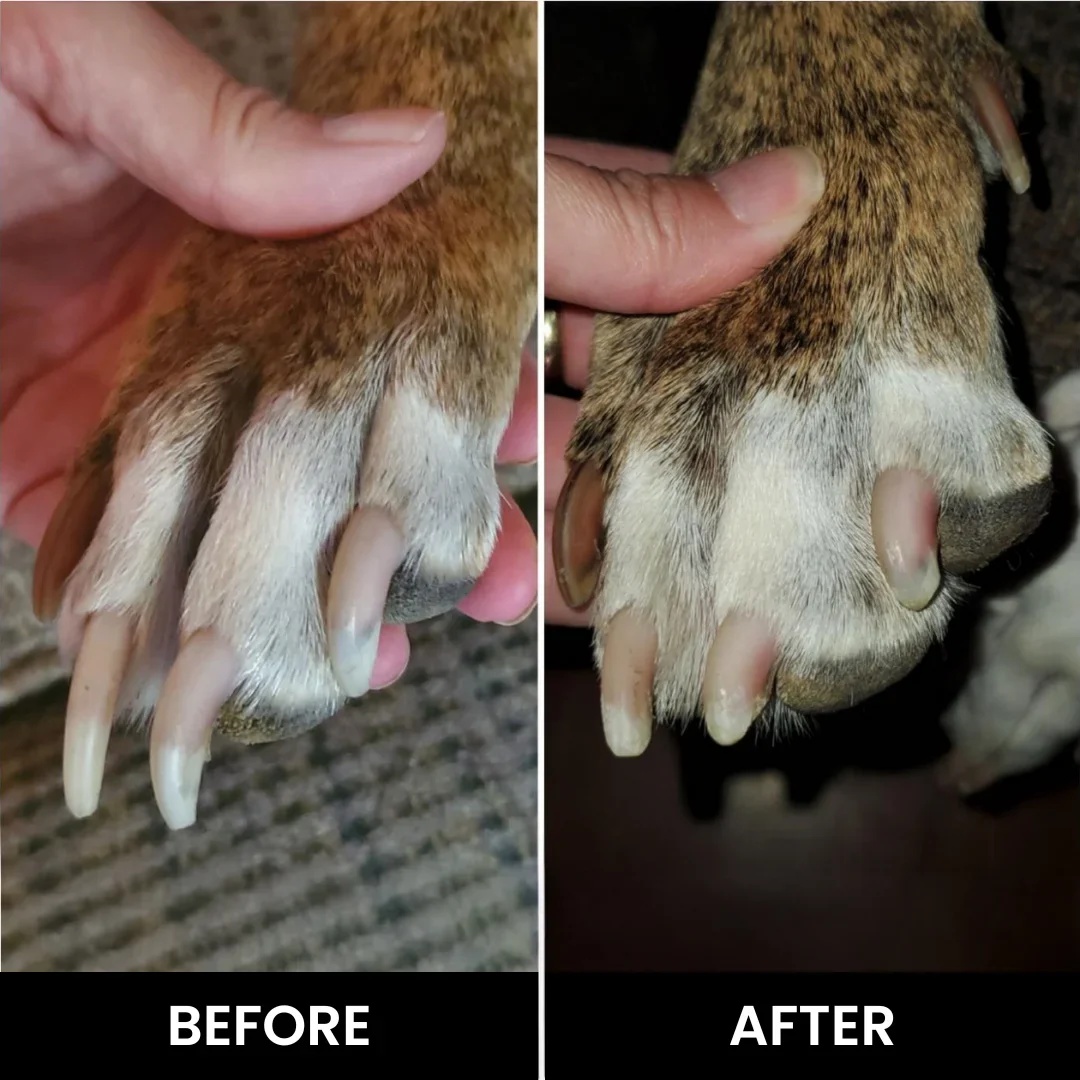
Sanding is inherently safer than clipping because it allows you to wear away the hard outer keratin extremely slowly.
As you file, always stop and look directly at the tip of the claw to check for a small, moist gray circle.
This subtle visual indicator tells you that you are approaching the quick and must stop filing immediately.
Transitioning Your Dog from Manual Sanding to an Electric Grinder
Once your pet is completely comfortable with the touch of sandpaper, transitioning to an electric device is incredibly easy.
Using an electric cordless dog nail grinder provides unmatched speed, precision, and smooth results.
Introduce the mechanical tool gradually by placing it on the floor next to your dog while it is powered completely off.
Reward your pup with a treat simply for approaching and sniffing the new grooming device.
Next, turn the motor on at a distance so they can get used to the gentle whirring noise.
Our team at Zenpaw engineered the Maxpro Grinder with a whisper-quiet motor that produces less than 40 decibels of sound.
This ultra-quiet design prevents the sound-induced anxiety that typical high-speed rotary tools trigger.
When you are ready to file, gently press the rotating head against the claw at a precise 45-degree angle.
Apply light, steady pressure for no more than two seconds at a time to prevent any thermal heat from building up.
This careful method yields a perfectly rounded, smooth finish that prevents your dog’s claws from snagging on carpets.
How to Avoid Safety Hazards and Common DIY Grooming Mistakes
One of the most dangerous grooming mistakes is using cheap, dull metal clippers to trim long claws.
Dull blades exert immense lateral pressure on the toe, violently crushing and cracking the hard keratin outer shell.
This traumatic pressure can lead to painful vertical splits that allow bacteria to enter and infect the nailbed.
To avoid this structural damage, many owners switch to a dog nail clipper with light and grinder combo device.
However, using outdated, highly vibrating rotary tools can still terrify an anxious dog.
For example, a heavy-duty dremel 7300 pt dog nail grinder can sometimes vibrate too intensely for small, sensitive paws.
Excessive physical vibration can cause physical discomfort in the delicate joints of your dog’s leg.
Furthermore, manual sanding can generate intense friction heat if you rub the paper back and forth too aggressively.
This concentrated friction heat can actually burn the live tissues of the quick underneath the nail.
Always work in very short, controlled bursts and touch the claw with your finger to ensure it remains cool.
Never force your pet to sit through a complete grooming session if they show signs of stress or heavy panting.
Breaking the grooming routine into several short, positive experiences builds long-term trust and relaxation.
Frequently Asked Questions About Grooming Claws with Sandpaper
Based on grooming feedback from over 18,587+ Zenpaw users, we have answered the most common questions regarding DIY sandpaper nail care.
Is manual sandpaper filing safe for heavy, thick claws on large breeds?
Yes, manual filing is entirely safe for large breeds, but it requires a very coarse paper grit to be effective.
Large dogs have highly dense claws that will quickly wear down and smooth out standard sandpaper sheets.
You must use a heavy-duty 80-grit paper and expect to replace the sheets frequently during a single session.
Because manual sanding takes a tremendous amount of physical effort, an electric grinder is highly recommended for larger dogs.
How often should I allow my dog to use a scratch board?
We recommend allowing your dog to use their scratch board once or twice per week for maintenance.
This consistent schedule keeps the front claws naturally short without letting the quick grow too long.
Always monitor the training session closely to ensure your dog does not scrape their sensitive skin pads on the rough paper.
If you notice any signs of redness, swelling, or raw skin on the paw pads, stop the activity immediately.
Can I use a standard human nail file on my dog’s claws?
You can use a human file for minor touch-ups, but it is not practical for shortening thick claws.
Human nail files do not possess the abrasive strength required to quickly cut through tough canine keratin.
Using a human emery board for full grooming will take an exceptionally long time and exhaust your hands.
For actual length reduction, industrial-grade sandpaper or a professional electric grinder is absolutely necessary.
Why does my dog run away when I turn on my old nail grinder?
Most traditional nail grinders utilize loud, high-speed motors that produce terrifying high-frequency sounds.
Dogs have incredibly sensitive hearing and can feel these intense mechanical vibrations directly in their paw joints.
This sensory overload triggers their natural survival instincts, causing them to run, hide, or struggle.
Upgrading to a low-vibration grinder that operates under 40 decibels, like the Zenpaw Maxpro, completely eliminates this fear.
Conclusion
Transforming nail trims from a stressful chore into a peaceful, pain-free bonding experience is completely achievable with the right tools.
Ready to transform nail trimming from a battle into a breeze?
Explore the Zenpaw Maxpro 3-in-1 Grinder.
Call: 302-307-1000 — our team can help you advise on the best grooming practices and help with any product questions.
Note: Individual results may vary depending on individual dog breeds, nail thickness, and behavioral temperaments. This article is intended for general pet grooming reference purposes only and does not replace professional veterinary advice.