I still remember the absolute panic when my rescue pup limped in with a bleeding, torn claw. Trying to apply a secure dog nail bandage on a terrified, squirming pet felt completely overwhelming. That stressful night taught me the critical importance of having quiet tools and knowing exactly how to handle paw emergencies. At Team Zenpaw, we want to help you master this process safely while keeping your dog calm and comfortable.
Maxpro 3-in-1 Grinder.
Stress-Free Nail Trimming.
Whisper-quiet DC motor (<40 dB) eliminates fear & discomfort. Features 3 ports, dual speeds, and 7-hour battery life. Safe, precise, and painless.
In This Article
- Discover the exact step-by-step method to wrap a bleeding dog claw quickly.
- Learn how to secure a protective wrap that stays in place on active dogs.
- Understand the vital anatomy of the quick and how to avoid nail bed infections.
- Explore stress-free behavioral desensitization tips to make paw care a breeze.
How to Apply a Clean Dog Nail Bandage for Injured Paw Protection: A Step-by-Step Guide

You will need a few essential supplies before you start bandaging your dog’s injured claw.
Gather some sterile non-stick pads, elastic conforming gauze, and self-adhesive veterinary wrap.
Keep some styptic powder or cornstarch nearby to stop any sudden bleeding from the quick.
Ensure you have a roll of medical tape to secure the outer layers safely.
Have some high-value treats ready to reward your dog for their cooperation during the process.
-
Step 1: Clean and Assess the Injured Paw
First, you must evaluate the extent of the damage to the claw.
Gently wash the injured paw with lukewarm water to remove any dirt and yard debris.
If the claw is actively bleeding, apply styptic powder or clean cornstarch to stop the flow.
Avoid touching the exposed quick directly, as this is highly sensitive and painful for your dog.
Take a clear look to see if you are dealing with a how to treat a split dog nail situation or a completely torn-off claw.
-
Step 2: Apply a Non-Stick Padding Layer
Next, place a sterile, non-stick gauze pad directly over the injured claw.
This soft padding prevents the outer bandage from sticking to any open wounds or blood clots.
You can insert small pieces of cotton balls or rolled gauze between your dog’s individual toes.
This toe padding prevents friction and moisture buildup between the active sweat glands in their paw pads.
Ensure the pad remains flat and completely covers the affected nail bed.
-
Step 3: Secure with Conforming Gauze Wrap
Gently wrap a conforming stretch gauze bandage around the padded paw.
Start at the toes and slowly work your way up to the wrist or hock joint.
Keep the wrap snug enough to hold the padding in place but never wrap it too tight.
You should always be able to easily slip two fingers under the gauze layer.
Wrapping up the leg slightly prevents the entire sleeve from sliding off when your dog moves.
-
Step 4: Protect with a Self-Adhesive Bandage Layer
Apply a final layer of veterinary self-adhesive wrap over the conforming gauze.
This special elastic cohesive tape sticks only to itself and will not pull your dog’s sensitive fur.
Avoid stretching the elastic wrap tightly as you wind it around the leg.
Stretching cohesive bandages too much can restrict vital blood flow to the lower limb.
Press the layers together gently to activate the self-clinging property of the wrap.
-
Step 5: Keep the Bandage Clean and Dry
A wet bandage will quickly pull environmental bacteria directly toward the injured nail.
Always place a protective plastic bootie or a clean plastic bag over the wrap during outdoor walks.
Remove the plastic covering immediately once you return inside to let the skin breathe.
Monitor the wrap closely for any signs of sliding, tearing, or chewing from your dog.
Replace the entire dressing daily to check on the progress of the healing claw.
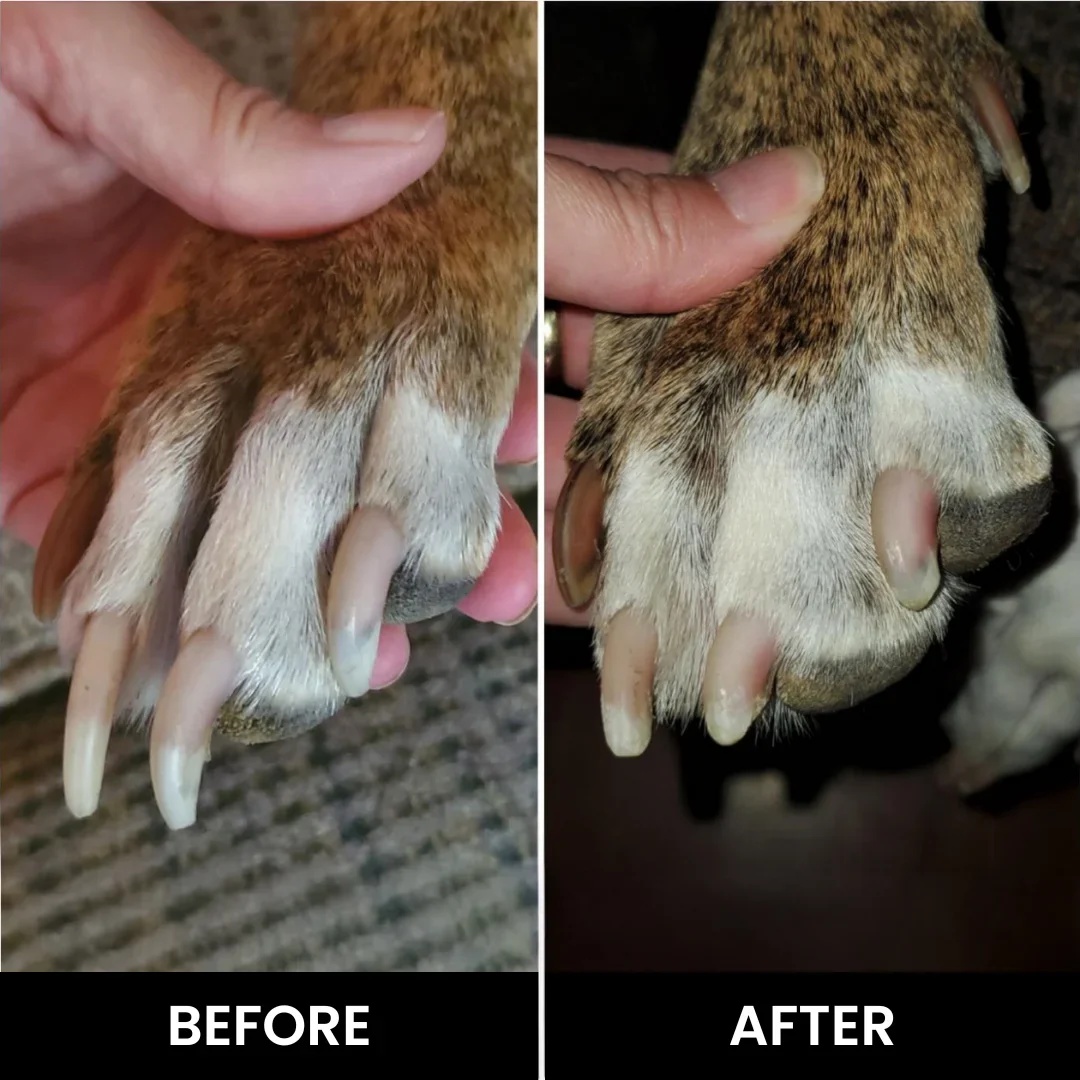
Keeping your dog’s nails short and smooth is the ultimate way to prevent painful snags.
At Team Zenpaw, we designed the Zenpaw Maxpro 3-in-1 Grinder to make ongoing paw maintenance completely stress-free.
Unlike traditional clippers that crush and split the nail, this grinder uses a gentle diamond drum to file claws safely.
You can support your dog’s long-term claw health and avoid future injury scares by exploring the Zenpaw Maxpro 3-in-1 Grinder today.
99-Day 100% Money-Back Guarantee
“Ever since we started using the Zenpaw Maxpro Grinder, it’s been such a peaceful experience. It’s very quiet, and my dog actually relaxes. It’s turned our stressful sessions into quick, quiet grooming times.”
— Sarah M. | ✔ Verified Customer
- ✓ Prevents Infection & Splitting
- ✓ Ideal for All Dog Sizes
- ✓ Low-Vibration Technology
- ✓ Fast 2-7 Days Delivery
Need Support? Call 302-307-1000
Understanding Canine Nail Anatomy and Why Protection Matters

Your dog’s paws are remarkably complex structures that require daily protection.
Understanding the anatomy of a canine claw is crucial for every pet owner.
When a claw breaks, it is not merely a cosmetic issue for your dog.
A broken nail can cause immense physical pain and emotional stress for your pet.
The outer shell of the nail is composed of hard, dead keratin proteins.
This outer layer shields the delicate living tissue hidden deep inside.
When this protective layer is breached, your dog is left vulnerable to environmental infection.
Many pet parents do not realize how quickly a minor break can escalate.
Without immediate care, a simple split can affect your dog’s overall mobility.
It is important to act quickly to secure the area and prevent further damage.
A clean barrier is the best way to support your dog’s natural recovery process.
We always suggest taking a calm, systematic approach to handling paw injuries.
By learning the proper techniques, you can keep your pet happy and pain-free.
Let us explore the specific anatomical parts that require your close attention.
Patience is your absolute best friend during this restorative training process.
Every small step forward is a victory for you and your beloved companion.
The Vulnerability of the Exposed Quick
The living core inside your dog’s claw is called the quick.
This core contains an intricate network of blood vessels and nerves.
When a nail breaks off completely, the quick is left entirely exposed.
This exposure causes sharp, localized pain every time your dog walks.
Even a light touch to an exposed quick can cause your dog to jump.
The quick is directly connected to the digital bone of the toe.
This anatomical connection means that infections can spread to the bone quickly.
Keeping the quick covered with a clean wrap is absolutely vital.
A soft bandage acts as a surrogate shield while the new keratin grows.
It also prevents your dog from constantly rubbing the raw tissue on carpets.
Protecting this area is the first step toward a successful recovery.
Always handle this sensitive part with the utmost gentleness and care.
Your attentive touch will help keep your dog calm during the process.
The Threat of Nail Bed Infections
Dogs possess active sweat glands located directly in their paw pads.
This sweat creates a naturally warm, humid environment between their toes.
This humid microclimate is the perfect breeding ground for opportunistic bacteria.
When a claw splits, these bacteria can easily migrate into the nail bed.
An infection in the nail bed can cause severe swelling and redness.
You should review these early stage infected dog nails pictures to spot problems early.
Common signs include a bad odor, yellow discharge, and constant limping.
Applying a dry bandage helps absorb moisture and blocks dirt from entering.
You must keep the bandage completely dry during outdoor potty breaks.
If moisture gets trapped inside the wrap, it will accelerate bacterial growth.
We recommend checking the wound daily for any unusual changes or discharge.
Preventing infection is much easier than treating a deep-seated nail bed issue.
Early identification of these signs is key to your dog’s ongoing comfort.
Preventing Self-Trauma and Constant Licking
A dog’s natural instinct is to soothe pain by licking their wounds.
While this instinct is natural, canine saliva actually introduces oral bacteria.
Constant licking keeps the injured claw wet and prevents scab formation.
This dampness can quickly break down the surrounding healthy skin tissue.
Some dogs will even chew on the broken nail to remove the loose pieces.
This chewing behavior can cause further tearing and deeper bleeding.
A secure dressing physically blocks your dog from accessing the injured claw.
It provides an effective barrier without always requiring a hard plastic cone.
Most dogs will accept a bandage if it is comfortable and not too tight.
You can use positive reinforcement to reward your dog for leaving the wrap alone.
Keeping them distracted with a puzzle toy can also help during the first day.
Ensuring they cannot lick the wound is vital for rapid, clean healing.
Practical Application Guide and Behavioral Desensitization
Rebuilding your dog’s confidence after a painful paw injury takes patience.
Many dogs become highly defensive when anyone tries to touch their feet.
This defensive behavior is a natural response to protect themselves from pain.
You must show your dog that paw handling can be a positive experience.
We advocate for a slow, gentle approach that uses high-value food rewards.
Never force your dog or scold them if they pull their paw away.
Forcing the issue will only increase their anxiety and make future grooming harder.
Our goal is to turn paw care into a peaceful bonding routine.
By using the right tools, you can avoid painful nail breaks altogether.
Regular maintenance is key to keeping the claws short and structurally strong.
Let us look at how to introduce grooming tools to an anxious pet.
With the right technique, you can easily maintain their nails at home.
Patience is your absolute best friend during this restorative training process.
Every small step forward is a victory for you and your beloved companion.
The Science of Stress-Free Desensitization
Desensitization is the process of gradually reducing your dog’s fear response.
You want to pair the presence of grooming tools with their favorite treats.
Start by simply holding the Zenpaw Maxpro Grinder while your dog eats dinner.
Do not turn the device on during this initial introduction phase.
Once they are comfortable, touch the unpowered grinder gently to their leg.
Give them a treat immediately after the tool touches their fur.
Next, turn the grinder on while keeping it several feet away from them.
The whisper-quiet motor on our grinder operates at a soothing low frequency.
This low sound under 40 decibels will not trigger their sensitive hearing.
Slowly bring the humming grinder closer while feeding them high-value treats.
This technique teaches your dog that the quiet sound predicts delicious rewards.
Over time, their fear will transform into happy anticipation of grooming time.
With consistent practice, they will relax completely during the entire process.
Proper Grinding Angles and Safe Trimming Techniques
When you are ready to file the nails, correct positioning is vital.
Hold your dog’s paw firmly but gently to prevent sudden movements.
You should hold the Zenpaw Maxpro Grinder at a precise 45-degree angle.
This angle matches the natural slope of the canine claw structure.
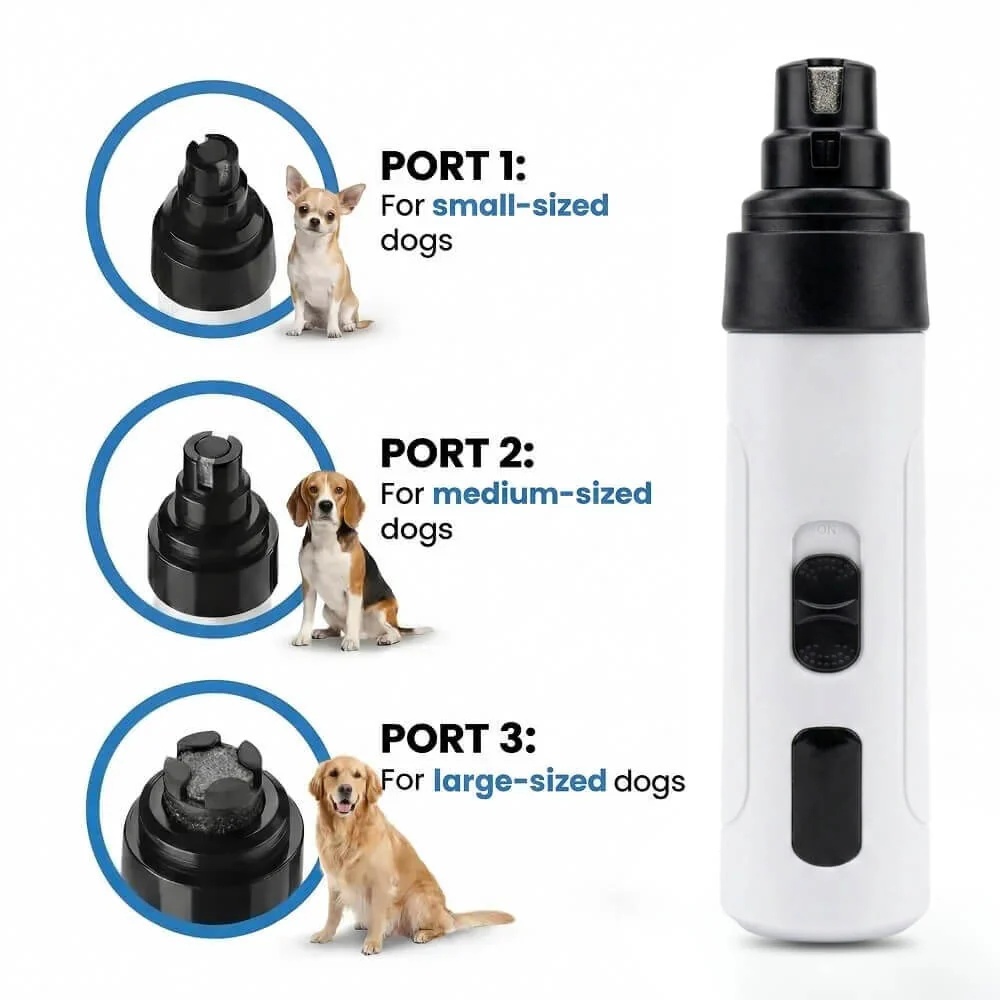
Use the specialized port that best fits the size of your dog’s nail.
Apply the grinding head to the nail for only two to three seconds at a time.
Filing in short, gentle bursts prevents any uncomfortable friction heat buildup.
This gradual filing method lets you see the quick before you get too close.
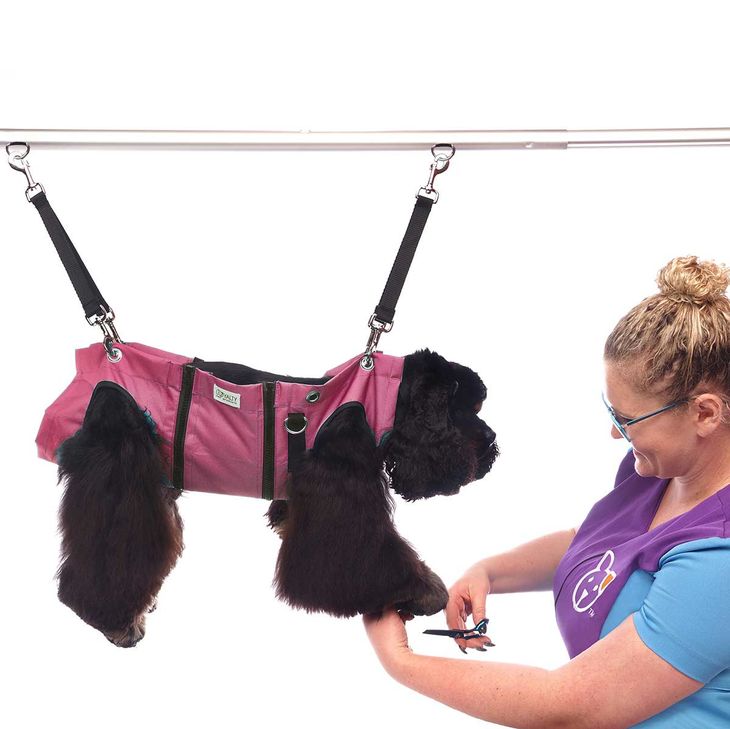
If you have an extremely active pup, a dog nail scratch box is a great alternative.
For dogs that wiggle excessively, you can wrap dog in towel to cut nails or grind them safely.
This simple swaddling technique helps keep your dog calm and perfectly secure.
Safe grooming practices will keep their paws healthy and prevent future splits.
Overcoming Risks and Common Bandaging Mistakes
Bandaging a dog’s paw at home requires precision and careful monitoring.
While the process is straightforward, simple mistakes can lead to serious risks.
Many well-meaning pet parents inadvertently cause more discomfort by wrapping incorrectly.
Our priority is to keep your dog safe and comfortable during recovery.
You must learn what warning signs to watch out for after bandaging.
Understanding these potential pitfalls will help you avoid costly veterinary emergencies.
We believe that education is the most powerful tool for pet wellness.
By recognizing the risks, you can protect your dog’s paws with complete confidence.
Let us examine the most common mistakes made during paw bandaging.
We will also cover how to choose the safest grooming tools for prevention.
Your dog’s long-term paw health depends on these daily care choices.
Taking a proactive, informed approach will save you stress and money.
Let us dive deep into the specific risks and how to avoid them.
Even small adjustments in your technique can make a massive difference in healing.
Your attentive care is the most valuable asset in your dog’s wellness journey.
The Danger of Wrapping an Injured Dog Nail Too Tightly
The most common error is applying the veterinary wrap with too much tension.
Self-adhesive bandages naturally contract and tighten after they are applied.
A tight wrap acts like a tourniquet and cuts off critical blood circulation.
This restricted blood flow can cause severe tissue damage within hours.
You must check the wrap regularly to ensure it is not too tight.
Gently feel the two middle toes of the bandaged paw for warmth.
If the toes feel cold or appear swollen, remove the bandage immediately.
You should always leave a small portion of the toes exposed for monitoring.
Ensure you can easily slip two fingers under the bandage at all times.
If your dog starts biting at the wrap, it is likely too tight.
Applying a loose but secure wrap is the key to safe claw recovery.
Never sacrifice your dog’s circulation for a bandage that stays on easier.
Why Dull Clippers are Dangerous Compared to Safe Grinding
Many pet parents use traditional, dull scissor clippers that crush the nail.
This heavy crushing force causes the nail structure to split and crack.
These structural cracks often travel up into the sensitive quick tissue.
This can lead to immediate pain, bleeding, and long-term claw damage.
To understand the risks, look at what happens if you never cut your dog’s nails regularly.
Overgrown nails are far more likely to snag, tear, and split open.
Using a quiet grinder allows you to file the nail down micro-layer by micro-layer.
This gradual filing is completely painless and keeps the nail edge smooth.
You can also learn how to cut black dog nails using flashlight tools to see the quick.
Illuminating the nail helps you avoid accidental bleeding on dark claws.
Switching to a modern grinder eliminates the fear of hurting your pet.
It is the safest way to maintain strong, healthy claws for life.
Frequently Asked Questions About Canine Paw Bandages
Is the Zenpaw Grinder safe for large dogs with thick nails?
Yes, the Zenpaw Maxpro features three distinct grooming ports to accommodate all dog sizes.
The large open port is specifically engineered to handle thick, heavy claws of larger breeds.
Our heavy-duty brass motor provides ample torque to file down dense nails smoothly without stalling.
For optimal results, use the high-speed setting on exceptionally large or thick nails.
This versatile design ensures that every dog in your family receives safe, gentle care.
How long does the battery last on a single charge?
The Zenpaw Maxpro is equipped with a high-capacity lithium-ion battery that lasts up to 7 hours.
This long runtime allows you to complete multiple grooming sessions without worrying about losing power.
The device is fully rechargeable using a standard USB cable, making it perfect for travel.
A convenient battery indicator light lets you know when it is time to plug the device in.
You will enjoy the freedom of a long-lasting, cordless grooming experience every time.
Which speed setting is best for anxious dogs?
We highly recommend starting on the low-speed setting for any dog showing signs of grooming anxiety.
The low speed minimizes vibration and produces the lowest noise output of under 40 decibels.
This ultra-quiet operation helps keep highly sensitive dogs calm and cooperative.
You can easily switch to the high-speed setting once your pet becomes comfortable with the sensation.
Starting slowly ensures a positive, stress-free experience for your beloved pet.
Does the grinding head get hot during use?
Our advanced diamond bit is designed with low-heat technology to prevent friction burns.
However, holding any grinder on a single spot for too long can cause a warm sensation.
We recommend using brief, pulsing strokes of two to three seconds per claw.
This pulsing method allows the nail to cool down between filings and ensures maximum comfort.
Your dog will appreciate this gentle, thoughtful approach to nail maintenance.
How often should I change my dog’s nail bandage?
You should change your dog’s paw bandage at least once every 24 hours.
Changing the wrap daily allows you to inspect the wound for signs of moisture or discharge.
If the bandage gets wet from grass or rain, you must replace it immediately.
Leaving a damp bandage on a paw can trap moisture and cause a severe skin infection.
Daily inspections are the best way to ensure a fast, clean healing process.
Conclusion
A minor paw injury does not have to be a major source of stress for your family.
By learning how to apply a safe bandage, you can protect your dog’s paws with confidence.
Our team at Zenpaw is always here to support your grooming journey.
Ready to transform nail trimming from a battle into a breeze?
Explore the Zenpaw Maxpro 3-in-1 Grinder today.
Call: 302-307-1000 — our team can help advise on the best grooming practices and help with any product questions.