For years, I dreaded the moment my sweet golden retriever looked up at me with shaking paws, sensing my terror as I held heavy metal clippers over his delicate nails. I was constantly terrified of hurting him, hearing that sharp yelp, or seeing blood pool onto the rug. If you are struggling with how to clip dog nails at home, please know you are not alone, and our team at Zenpaw is here to share a peaceful, painless path forward.
Maxpro 3-in-1 Grinder.
Stress-Free Nail Trimming.
Whisper-quiet DC motor (<40 dB) eliminates fear & discomfort. Features 3 ports, dual speeds, and 7-hour battery life. Safe, precise, and painless.
In This Article
- Step-by-Step Tutorial: Learn the exact mechanical process to safely trim your dog’s nails.
- Understanding Anatomy: Master the visual cues to identify the quick on light and dark nails.
- Desensitization Psychology: Discover clinical methods to calm even the most anxious pets.
- Angle & Grinding Mastery: Understand the physics behind the perfect 45-degree nail edge.
- Risk Mitigation: Learn how to handle emergencies and prevent structural paw damage.
How to Clip Dog Nails at Home: A Step-by-Step Guide

To master best way to trim dog’s nails, you need the right tools and a structured approach.
Before you begin, gather a safe rotary grinder, a small towel, styptic powder for emergencies, and high-value treats.
We recommend using a quiet, specialized tool rather than heavy manual clippers to protect your dog’s nerve endings.
Take time to find a well-lit space where you can work slowly and deliberately.
Step 1: Create a Calm, Low-Stimulus Grooming Zone
Begin by choosing a quiet, enclosed room away from household distractions.
Place your dog on a non-slip surface like a thick yoga mat or a soft, familiar blanket.
Sit comfortably at your pet’s level rather than hovering over them in a dominant posture.
Introduce the grooming tools slowly, letting your dog sniff them while rewarding them with treats.
Ensure that your own physical energy remains calm, slow, and completely patient.
Your dog will instantly mirror your emotional state during this initial setup phase.
Step 2: Isolate the Paw and Stabilize the Digit
Gently pick up one of your dog’s paws and hold it securely but lightly in your palm.
Place your thumb on the pad of a single toe and your index finger on the skin above the nail.
Push your thumb slightly forward while drawing your index finger back to isolate the nail.
This simple physical manipulation separates the target nail from any surrounding long paw hair.
It also prevents the dog from suddenly jerking their entire limb while you are working.
Always hold the toe firmly enough to absorb minor muscle twitches without pinching the delicate webbing.
Step 3: Analyze the Cut Zone and Find the Quick Boundary
Inspect the shape and color of the nail carefully under a bright, direct light source.
Look for the visual change in density where the pink, living tissue transitions to the dead outer shell.
If your dog has smaller paws, utilizing specialized tools like best small dog nail clippers can make this view much clearer.
Never rush this inspection step, as locating the biological boundary is crucial for a pain-free trim.
Mark a mental boundary line at least two millimeters away from the sensitive pink area.
For dark nails, plan to trim in incredibly micro-sized, gradual increments to avoid any sudden mistakes.
Step 4: Execute the Trim or Grind in Brief, Controlled Bursts
Bring your trimming tool to the nail edge and align it at a stable angle.
Apply gentle pressure for no more than two consecutive seconds to prevent heat buildup on the nail bed.
If using a grinder, allow the rotary wheel to do the structural work without pushing it hard into the nail.
Pause after each brief touch to praise your dog and examine the newly exposed nail surface.
Move fluidly from the outer sides of the nail toward the center to shape it naturally.
This methodical approach keeps the nail structure strong and completely prevents painful crushing sensations.
Step 5: Smooth the Edges and Reward Your Dog
Gently run your finger over the finished nail tip to check for sharp edges or rough corners.
Use very light, circular sweeps with your grinder to round out the tip into a smooth, clean dome.
A polished, snag-free finish ensures your dog will not scratch themselves or damage your home flooring.
Once you finish a single paw, reward your dog immediately with a premium treat and verbal praise.
Never feel pressured to complete all four paws in one session if your pet shows signs of mental fatigue.
Building positive associations is far more important than completing the task quickly.
To make this multi-step process truly stress-free, the Zenpaw Maxpro 3-in-1 Grinder offers a perfect engineering solution.
Its whisper-quiet motor operates under 40 decibels to prevent startling sensitive canine ears.
Explore how this veterinarian-approved tool can transform your home routine by visiting the Zenpaw Maxpro Grinder Store.
99-Day 100% Money-Back Guarantee
“Ever since we started using the Zenpaw Maxpro Grinder, it’s been such a peaceful experience. It’s very quiet, and my dog actually relaxes. It’s turned our stressful sessions into quick, quiet grooming times.”
— Sarah M. | ✔ Verified Customer
- ✓ Prevents Infection & Splitting
- ✓ Ideal for All Dog Sizes
- ✓ Low-Vibration Technology
- ✓ Fast 2-7 Days Delivery
Need Support? Call 302-307-1000
Understanding Canine Nail Anatomy: Where is the Quick?
To safely execute at home pet claw care, a deep understanding of nail biology is necessary.
The canine claw consists of two distinct structural layers: the hard outer shell and the highly sensitive inner quick.
The outer shell is made of dense, keratinized tissue that does not contain any nerve fibers or blood vessels.
Beneath this protective shield lies the quick, a delicate living core rich in blood vessels and active nerve endings.
Cutting into this vascular bundle causes immediate, sharp pain and moderate bleeding for your dog.
Understanding this internal structure is the foundation of all safe home grooming practices.
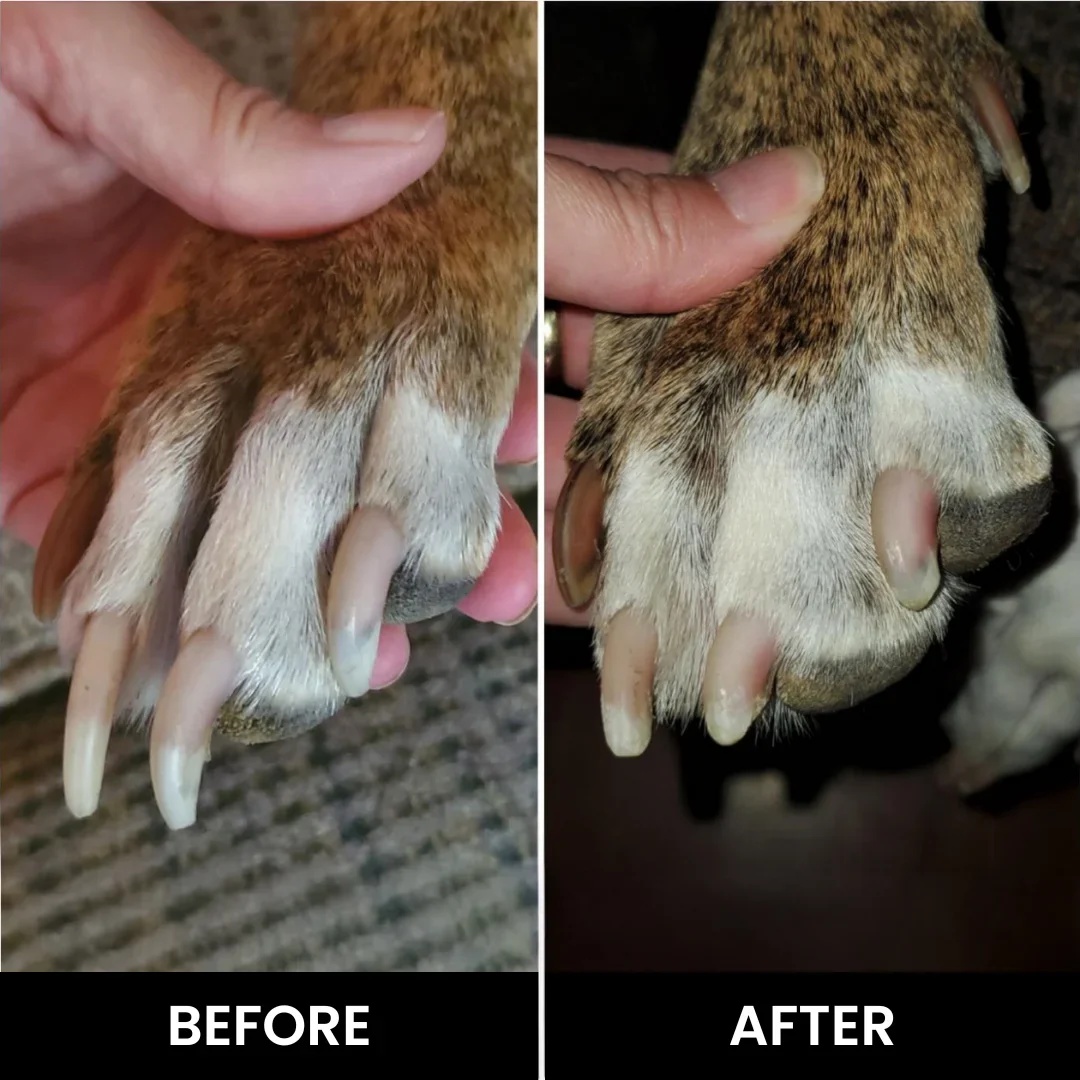
How the Quick Changes as Nails Grow
When a dog’s nails are left untrimmed, the inner quick naturally extends forward toward the tip of the claw.
This biological growth makes it much harder to shorten long claws without accidentally nicking the living tissue.
However, regular micro-trimming encourages the quick to gradually recede back toward the paw bed over time.
By removing just a fraction of a millimeter every week, you can safely restore overgrown claws to a healthy length.
Consistent, tiny adjustments are always safer than trying to perform major skeletal corrections in a single session.
Visual Identification in Light vs. Dark Nails
On light-colored claws, locating the quick is incredibly simple because the tissue is highly translucent.
You will see a clear pink column running through the center of the white or semi-clear keratin shell.
Simply stop your trim at least two millimeters before this pink area begins to keep the nail bed safe.
On solid black nails, however, the quick is completely hidden by dense dark pigments.
You must rely on tactile changes and structural landmarks at the tip of the claw to guide your cuts.
Looking at the underside of the nail reveals a hollow, scoop-like groove where the safe outer shell ends.
How to Safely Grind Black Dog Nails Without Bleeding
Trimming dark claws safely at home requires a specialized approach known as the “chalky center” technique.
Because you cannot see through the dark outer shell, you must inspect the cut surface after every single pass.
This incremental method ensures that you stop before reaching the sensitive nerve endings deeper in the claw.
Using a high-quality rotary tool allows you to make these tiny, safe adjustments with absolute precision.
Step-by-Step “Chalky Center” Technique
Start by shaving or filing away the very tip of the black nail in a single, light swipe.
Look directly at the newly cut cross-section under a bright, clear light source.
At first, you will see a dry, solid black or grey powdery surface across the cut area.
Make another very light pass with your tool and inspect the cut surface once again.
As you get closer to the living tissue, the dry powder will transition to a soft, chalky white circular pattern.
This white circular area is your final warning sign that you are approaching the edge of the living quick.
If you make one more light pass, the white area will turn into a small, dark, jelly-like black dot right in the center.
This moist black dot is the outer protective sheath of the quick itself, and you must stop immediately.
Applying any further pressure beyond this point will break the blood vessel and cause pain.
The Advantages of Gradual Filing
Using a slow, controlled grinding wheel is vastly superior to the sudden, crushing force of manual clippers.
Clippers apply intense pressure from two opposing sides, which can crack and splinter brittle black claws.
Grinders gently shave away micro-layers of keratin without putting stress on the internal structures of the toe.
This smooth process minimizes structural vibration, which keeps your dog calm and relaxed throughout the session.
Our team at Zenpaw designed the Maxpro Grinder with these specific anatomical challenges in mind.
Practical Application Guide: Mastering the 45-Degree Grinding Angle

To keep your dog’s paws structurally healthy, you must understand how to hold and angle your grooming tools.
Grooming is not just about shortening the claw; it is about maintaining your dog’s natural posture and gait.
The goal is to create a smooth, angled tip that sits completely clear of the floor when your dog stands.
Using the correct physical technique ensures your dog can walk comfortably on any surface without joint strain.
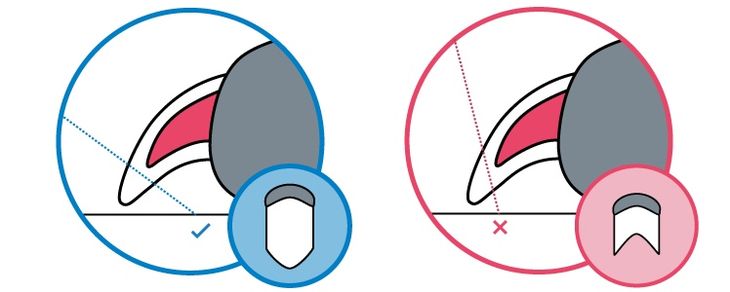
The Classical 45-Degree Angled Cut
When trimming, always position your tool at a precise 45-degree angle relative to the bottom of the paw.
This angle matches the natural downward slope of the claw’s biological growth pattern.
Trimming straight across horizontally leaves a sharp, blunt edge that can catch on carpets or rough pavement.
An angled cut allows the nail to glide smoothly over the ground as your dog walks.
It also naturally encourages the internal quick to recede back toward the paw bed much faster.
Always work from the bottom of the nail upward to maintain complete visual control over your work.
Step-by-Step Desensitization Protocol
If your dog is anxious, you must build their trust using a slow, positive conditioning plan.
Spend the first three days simply touching your dog’s paws with the grooming tool while it is completely turned off.
Reward them with high-value treats every time they allow you to hold a toe without pulling away.
Next, turn the tool on so it hums, but keep it a few feet away from your dog’s body while offering treats.
Slowly bring the running tool closer over several sessions until you can touch the handle gently to their shoulder.
The calm, low-vibration hum of the Zenpaw Maxpro makes this step incredibly easy for sensitive dogs.
Once your dog associates the gentle hum with tasty rewards, you can proceed to grind a single nail.
Never rush through these steps, as building a strong foundation of trust will save you years of grooming struggles.
Preventing Splits, Cracks, and Painful Snags
Many pet owners do not realize that choosing cheap or improper tools can lead to serious paw injuries.
Using dog nail clippers scissor style on large, thick claws can cause the nail to splinter under pressure.
This painful cracking can extend high up into the living tissue, causing severe discomfort and infection.
If a cracked nail catches on a rough outdoor surface, it can result in a painful dog toe nail ripped off entirely.
These structural failures are why professional groomers are moving away from traditional crush-style clippers.
Rotary grinders work by gently wearing down the tough outer keratin fibers of the claw.
This smooth, friction-based process eliminates the sudden, jarring shock that manual clippers send through the toe bone.
It leaves the outer shell perfectly smooth, sealed, and completely free of micro-fractures.
By protecting the integrity of the nail wall, you safeguard your dog’s long-term mobility and comfort.
Let us look at a direct comparison between these two common home grooming methods.
| Grooming Feature | Zenpaw Maxpro Grinder | Traditional Manual Clippers |
|---|---|---|
| Primary Mechanism | Gentle, high-speed rotary filing | Two-sided mechanical crushing force |
| Risk of Splitting Claws | Extremely low (shaves in smooth layers) | High (cracks brittle or dry nails) |
| Noise and Vibration | Whisper-quiet (under 40dB) | Loud click sound (can startle dogs) |
| Visual Safety | Allows for precise micro-adjustments | Blinds your view of the quick |
| Resulting Tip Style | Perfect, smooth rounded dome | Sharp, raw jagged edges |
Frequently Asked Questions about At-Home Nail Care
Here are the most common questions our pet wellness team receives about managing dog claws safely at home.
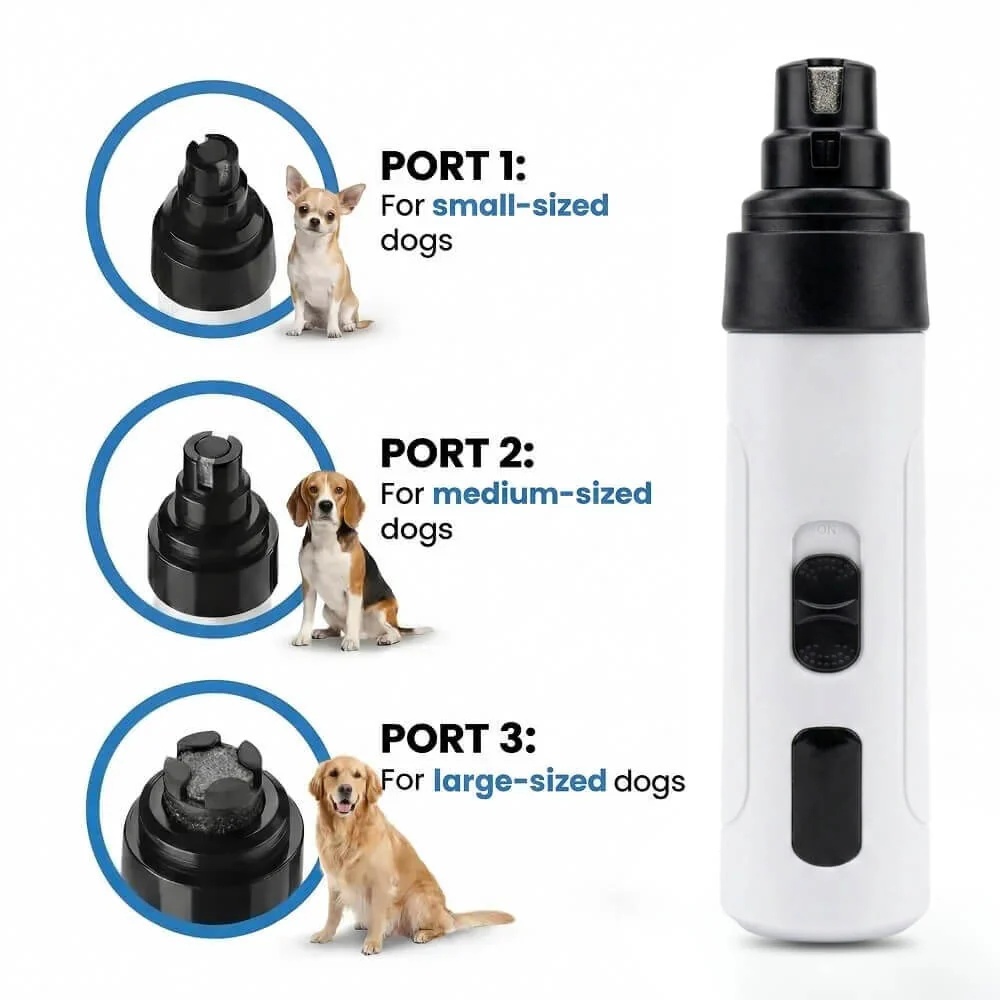
Is the Zenpaw Grinder safe for large, heavy dog breeds?
Yes, the Zenpaw Maxpro is fully optimized to tackle the thickest, toughest claws with ease.
It features a powerful dual-speed motor and three specialized ports to accommodate small, medium, and large dogs.
For heavy breeds, you can learn more about how to trim large dog nails using our large open port.
Simply use the highest speed setting and work in short, two-second bursts to file down thick nails safely.
How long does the battery last on a single charge?
The Zenpaw Maxpro features a high-capacity lithium-ion battery that delivers up to seven hours of continuous run time.
It comes with a universal USB charging cable, allowing you to charge it easily using any standard adapter or computer port.
This long-lasting battery life means you can complete multiple stress-free grooming sessions without worrying about power.
Does the grinding tip get hot during use?
Our engineering team developed advanced low-heat technology for the Maxpro’s ceramic grinding wheel.
This design prevents heat from building up on the nail, which can cause discomfort to the sensitive quick.
However, we always recommend moving the grinder from nail to nail to allow each digit a few moments to cool.
What should I do if I accidentally nick the quick and it starts to bleed?
First, remain completely calm, as your dog will react to your emotional energy.
Immediately apply a small pinch of styptic powder directly to the bleeding tip with moderate pressure.
Hold your finger firmly against the tip for sixty seconds until the bleeding stops completely.
If you do not have styptic powder, cornstarch or baking flour can work as a safe household alternative.
Offer your dog a high-value treat and end the session on a positive, comforting note.
Conclusion: Your Path to Stress-Free Paw Care
Taking care of your dog’s nails at home does not have to be a stressful battle.
By understanding nail anatomy and using a gentle, step-by-step approach, you can make grooming a positive bonding experience.
With patience and the right tools, you can keep your pet’s paws healthy and happy.
Ready to transform nail trimming from a battle into a breeze?
Explore the Zenpaw Maxpro 3-in-1 Grinder. Call: 302-307-1000 — our team can help you advise on the best grooming practices and help with any product questions.