I still remember the absolute panic when I accidentally nicked my golden retriever’s quick years ago, the sudden rush of blood turning a peaceful grooming session into a traumatic scene for both of us. It was that terrifying moment that drove me to learn how to cauterize dog nails safely, and ultimately inspired our team to design a stress-free solution to prevent these injuries entirely.
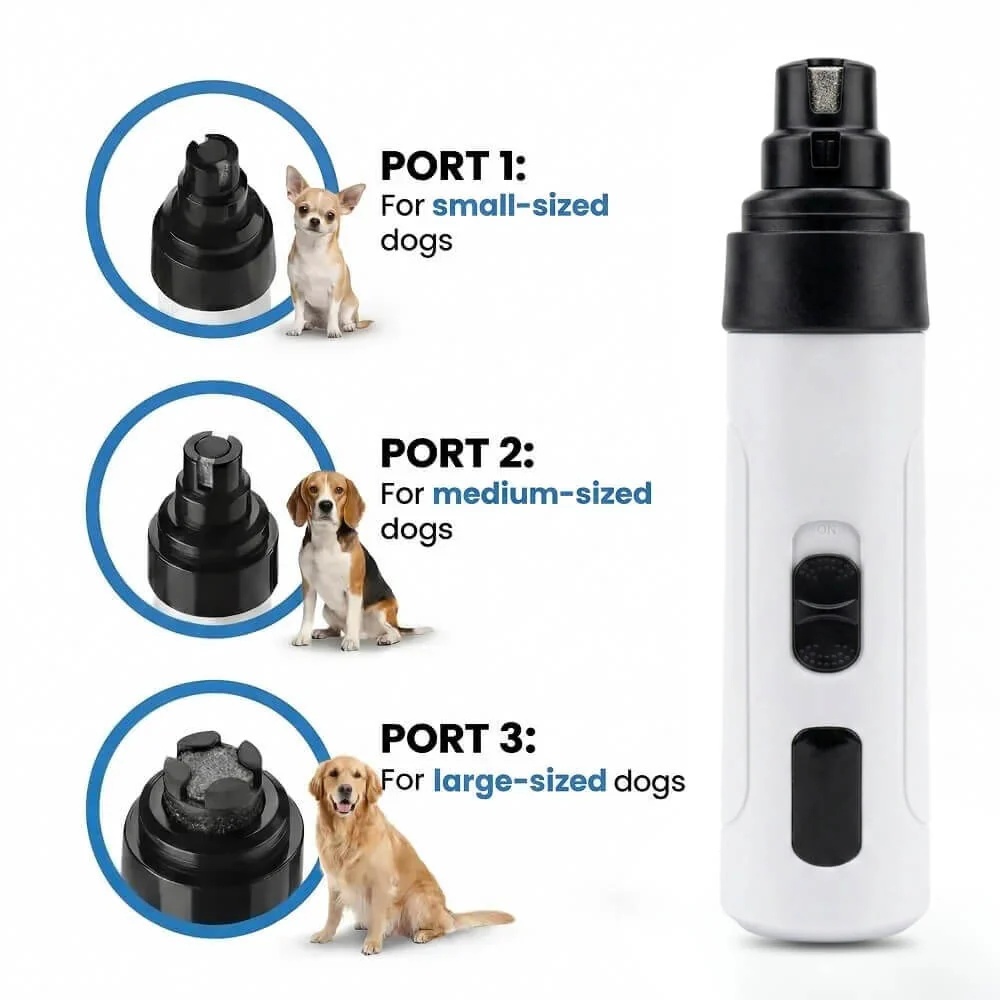
Maxpro 3-in-1 Grinder.
Stress-Free Nail Trimming.
Whisper-quiet DC motor (<40 dB) eliminates fear & discomfort. Features 3 ports, dual speeds, and 7-hour battery life. Safe, precise, and painless.
In This Article
- Step-by-Step Cauterization Guide: Learn how to manage sudden bleeding claws safely at home.
- Canine Nail Anatomy Deep Dive: Master the mechanics of the sensitive quick to prevent future injuries.
- Chemical vs. Heat Cauterization: Discover the professional tools and methods veterinarians rely on.
- Stress-Free Trimming Practices: Transition your pup away from fear with advanced desensitization steps.
How to Cauterize a Bleeding Dog Nail Safely: A Step-by-Step Guide
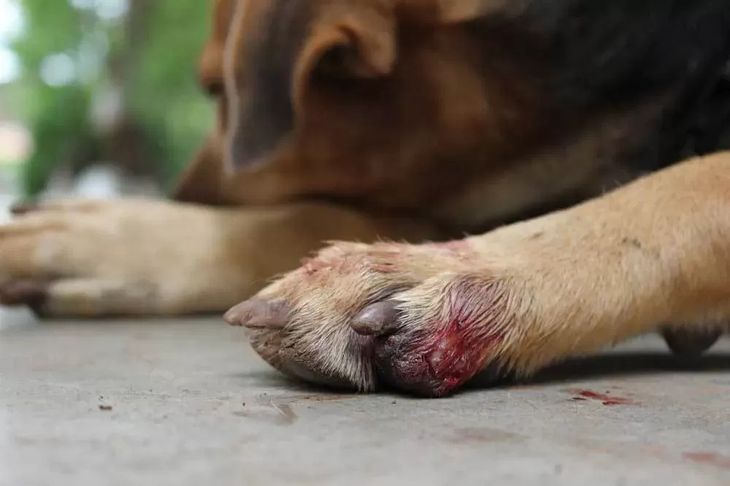
Accidentally cutting a dog’s nail too short is a highly stressful event for any pet owner.
Before you begin the physical process of stopping the bleeding, you must collect your thoughts and prepare a quiet, clean, and highly controlled space.
Having the right tools within arm’s reach ensures that you can act swiftly without leaving your dog unattended.
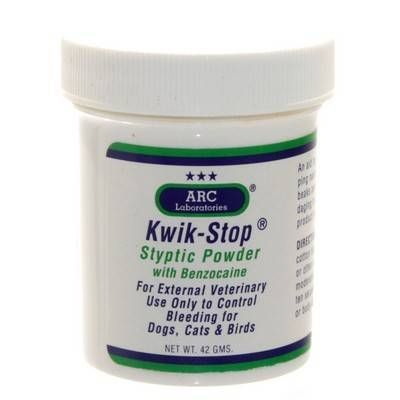
You will need professional-grade styptic powder, clean cotton balls, sterile gauze pads, and a highly valued treat to reward your dog afterwards.
Step 1: Secure Your Dog and Stay Calm
Your dog will immediately feed off your stress, fear, and elevated heart rate during an accident.
Speak in a low, incredibly soothing, and calm voice to reassure your dog that they are entirely safe with you.
Have a family member gently hold your dog to prevent any sudden kicking or painful pulling away during treatment.
If you are working alone, place your dog on a stable, non-slip surface where they cannot easily wiggle away.
Keep your movements slow, deliberate, and gentle to avoid triggering further panic in your pet.
Remember that securing the body gently protects both you and your canine companion from accidental scratches or bites.
Take a deep, centering breath before you make physical contact with the injured, bleeding paw.
Ensure that your dog’s face is oriented away from the wound so they do not try to lick it continuously.
Step 2: Clean and Inspect the Bleeding Claw
Gently but firmly grasp the injured paw in your hand to stabilize the affected toe.
Use a clean, damp cloth or sterile gauze to wipe away the excess blood pooling around the nail tip.
This allows you to clearly locate the exact point of the ruptured blood vessel within the nail structure.
Inspect the nail for any painful splits, cracks, or loose hanging fragments that might require veterinary intervention.
Avoid squeezing the injured toe directly, as the exposed quick is packed with highly sensitive nerve endings.
Keep a fresh, dry piece of gauze pressed lightly against the tip to temporarily slow the blood flow.
This cleaning step ensures that the cauterizing agent can bond directly to the bleeding tissue rather than loose blood.
Inspect the general area for any dirt or outdoor debris that could introduce harmful bacteria into the open wound.
Step 3: Apply the Cauterizing Agent or Styptic Powder
Pour a small, generous amount of professional styptic powder directly into the plastic lid of the container.
Press a clean, moistened cotton swab directly into the powder so a thick, solid clump adheres to the tip.
Alternatively, if you do not have styptic powder, you can learn about using baking soda to stop dog nail bleeding as a highly effective household alternative.
Press the powder-coated swab directly onto the exposed, bleeding quick with steady, focused accuracy.
If you are using professional silver nitrate matchsticks, hold the tip against the bleeding spot for several seconds.
Be prepared for your dog to flinch slightly, as chemical cauterization can cause a brief, mild stinging sensation.
Ensure the powder covers the entire tip of the cut nail to form a complete, secure seal.
Do not wipe the powder away, as it must mix with the blood to create the clotting reaction.
Step 4: Maintain Firm but Gentle Pressure
Hold the treated cotton swab or a clean piece of dry gauze against the nail tip with steady pressure.
Maintain this direct, continuous pressure for at least sixty to ninety seconds without pulling back to check.
Checking the wound too early can easily disrupt the delicate clot that is actively forming over the quick.
If blood continues to seep through the powder, apply a second thick layer of styptic agent immediately.
Keep your dog still and quiet during this crucial window to prevent any sudden spikes in blood pressure.
Steady, uninterrupted compression is the most vital component of successful home cauterization for pet claws.
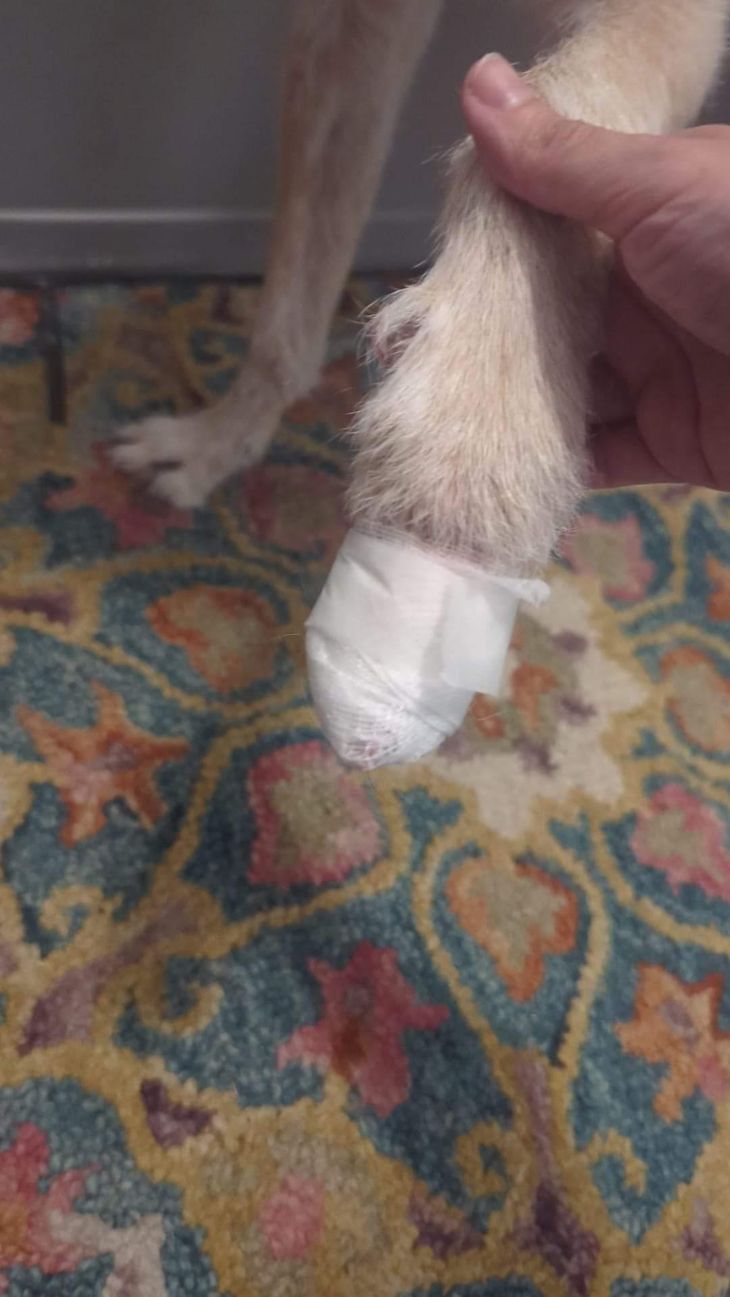
Once you slowly remove the gauze, ensure that the bleeding has stopped completely before letting go of the paw.
If the bleeding persists after three full attempts, wrap the paw loosely and contact your local veterinarian for advice.
Step 5: Reward Your Dog and Monitor the Claw
Immediately shower your dog with high-value treats and lavish verbal praise for their incredible bravery.
This positive reinforcement helps reshape their emotional association with the painful experience.
Keep your dog resting quietly on a comfortable dog bed for at least thirty to sixty minutes after the incident.
Avoid any vigorous running, jumping, or outdoor play that could easily reopen the freshly cauterized wound.
Monitor the paw closely over the next twenty-four hours for any signs of swelling, redness, or continuous limping.
Keep the paw completely dry and clean to prevent any late-stage infections from developing in the soft tissue.
If your dog won’t stop licking the nail, consider placing a temporary sock or protective boot over the paw.
Great job on staying calm and taking care of your dog’s immediate wellness needs with precision.
To avoid these highly stressful accidents altogether, we highly recommend shifting away from sharp clippers.
Our team at Zenpaw designed the Zenpaw Maxpro Grinder to make nail care completely worry-free.
By filing the nail down gradually, you can easily see the quick approaching and stop well before any bleeding occurs.
Experience the ultimate peace of mind by exploring the Zenpaw Maxpro 3-in-1 Grinder for your home grooming routine today.
99-Day 100% Money-Back Guarantee
“Ever since we started using the Zenpaw Maxpro Grinder, it’s been such a peaceful experience. It’s very quiet, and my dog actually relaxes. It’s turned our stressful sessions into quick, quiet grooming times.”
— Sarah M. | ✔ Verified Customer
- ✓ Prevents Infection & Splitting
- ✓ Ideal for All Dog Sizes
- ✓ Low-Vibration Technology
- ✓ Fast 2-7 Days Delivery
Need Support? Call 302-307-1000
Understanding Canine Nail Anatomy: Where is the Quick?
To successfully master home grooming, you must understand the complex physiological structure of your dog’s claws.
Canine claws are not simple pieces of dead keratin like human fingernails.
They contain a highly sensitive inner core known globally as the quick.
This quick is a highly vascular structure composed of blood vessels and extremely sensitive nerve endings.
When you cut into this zone, it causes sharp pain and immediate, profuse bleeding.
On light-colored nails, the quick appears as a distinct pink silhouette inside the translucent claw.
However, locating this boundary becomes a massive challenge when dealing with a dog nail quick black or darkly pigmented claws.
With dark nails, you must look at the cut surface of the nail head-on after each tiny trim.
When you see a small, dark grey or black spot appearing in the very center, you have reached the start of the quick.
This is your ultimate indicator to stop trimming immediately to prevent any painful injuries.
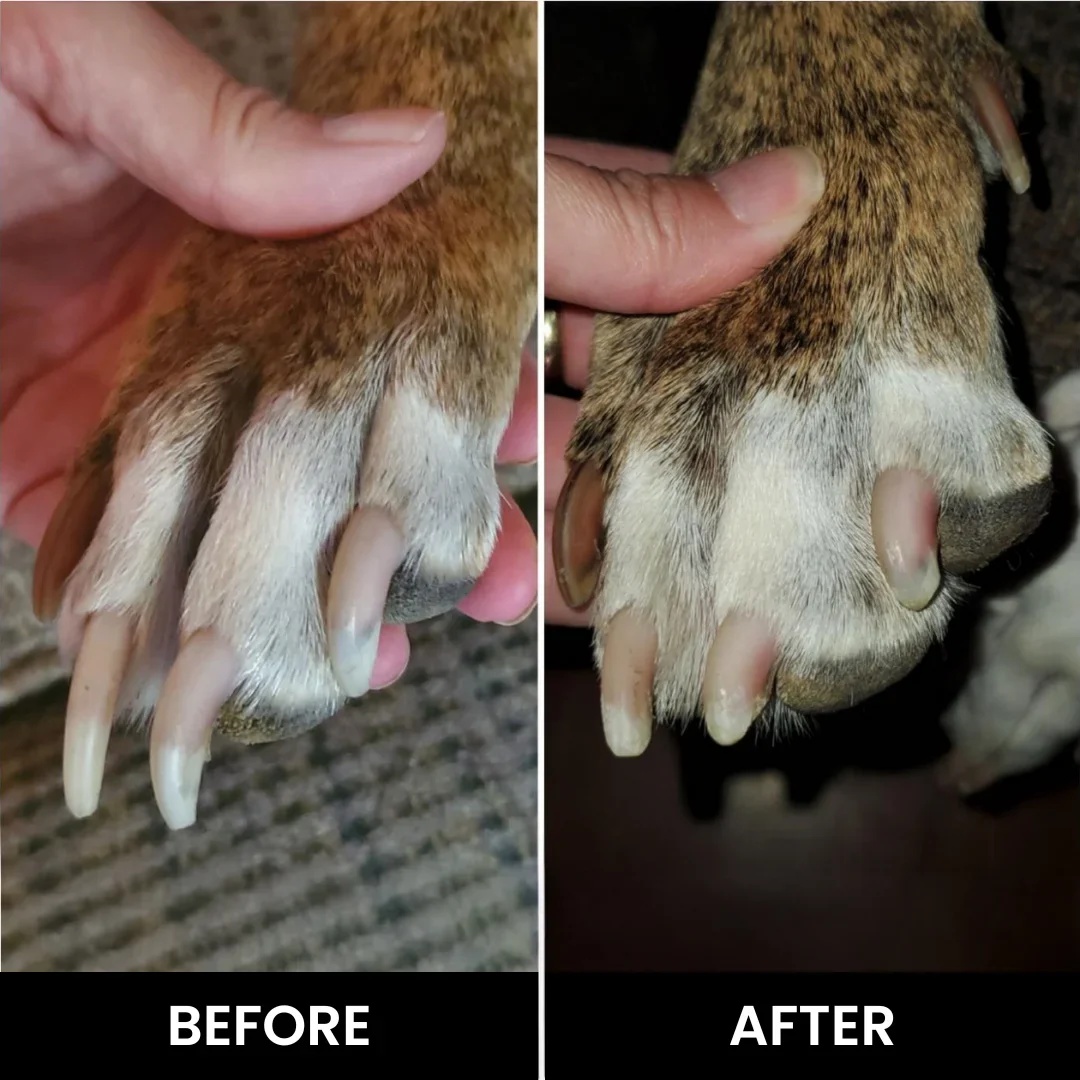
Overgrown claws actually cause the quick to grow longer and closer to the nail tip over time.
Regular, gradual trimming helps the quick recede naturally back toward the paw, allowing for shorter nails safely.
Understanding this anatomy is the absolute key to keeping your dog’s paws healthy, pain-free, and perfectly structured.
Chemical vs. Heat Cauterization: What Do Veterinary Professionals Recommend?
When a claw is cut too short, veterinarians and groomers rely on specific methods to halt blood flow.
Chemical cauterization is the most common, safe, and practical method utilized in modern clinical settings.
This method involves applying active chemical compounds, like silver nitrate or ferric sublets, directly to the wound.
These chemicals cause local proteins to precipitate, creating an instant, sterile plug that blocks the broken vessel.
Using a dedicated powder to stop dog nail bleeding is highly recommended by the American Kennel Club for home groomers.
Conversely, heat-based cauterization tools use electricity to burn and seal the blood vessels instantly.
While highly effective in surgical suites, heat cautery tools are incredibly dangerous for home use by untrained pet parents.
The intense heat can easily burn the surrounding paw pad or cause deep bone pain within the nail bed.
For safe, stress-free home care, chemical cauterization via styptic powders remains the gold standard.
Our team always advises keeping a fresh container of styptic powder on your shelf before starting any nail trim.
This simple preparation ensures that you can handle any minor bleeding incident calmly and professionally.
How to Safely Groom Your Dog’s Nails to Avoid the Quick Entirely
The best way to manage a bleeding quick is to make sure you never cut it in the first place.
Traditional clippers violently crush the nail, which can lead to painful cracking, splitting, and unexpected bleeding.
Transitioning your pet to a high-quality electric file completely changes the dynamics of home grooming.
We designed the Zenpaw Maxpro to act as the ultimate best dog nail grinder with light, illuminating the quick even on dark nails.
To introduce the grinder to an anxious dog, start by letting them simply sniff the device while it is turned off.
Reward them with high-value treats to create an immediate positive association with the tool.
Next, turn the whisper-quiet motor on and let them get used to the gentle hum without touching their paws.
When you begin grinding, hold the tool at a precise 45-degree angle to the nail tip.
Apply gentle pressure for only two to three seconds per nail before moving to the next toe.
This technique prevents heat from building up on the nail, ensuring your dog remains comfortable and relaxed.
By using a slow, gradual approach, you can easily spot the physical signs of the approaching quick.
This visual control makes the entire grooming process incredibly safe, precise, and completely pain-free.
Many pet owners find that an automatic dog nail trimmer or electric file reduces their personal anxiety as well.
Grooming should be a beautiful opportunity to bond with your beloved pet, not a source of mutual terror.
Crucial Mistakes to Avoid When Grooming and Cauterizing Claws
When a grooming accident occurs, making the wrong moves can easily escalate your dog’s distress.
One of the most common mistakes is panic-running around the house looking for supplies while leaving the dog bleeding.
Always have your styptic powder open and ready to use before you even touch your dog’s paws.
Another major mistake is comparing a dog nail clipper vs grinder and choosing cheap, dull clippers that crush the bone-like structure.
Dull clippers squeeze the nail, causing micro-fractures that can extend deep into the quick.
Never try to pull or yank the paw if your dog resists during a tense grooming session.
This sudden pulling action can cause you to slip, cutting the quick deeply and creating a severe injury.
Additionally, avoid using unhygienic household items like flour or cornstarch if you have access to sterile alternatives.
While these household powders can mechanically pack the wound, they do not possess active chemical clotting agents.
Lastly, do not allow your dog to run outside on rough dirt or concrete immediately after cauterizing a claw.
Give the fresh chemical seal at least an hour to harden and heal completely in a clean environment.
Frequently Asked Questions About Cauterizing Dog Claws
Is the Zenpaw Grinder safe for large dogs?
Yes, the Zenpaw Maxpro Grinder is specifically engineered with three distinct ports to accommodate pets of all sizes.
The powerful dual-speed DC motor can easily file down the thickest claws of large breeds without slowing down.
Simply use the wide opening port for larger dogs, and apply the same gradual 45-degree filing technique.
Our whisper-quiet technology ensures that even large, powerful dogs remain calm and cooperative throughout the process.
How long does the battery last on a single charge?
The Zenpaw Maxpro features a high-capacity, USB-rechargeable battery that lasts up to 7 hours on a single full charge.
This exceptional battery life allows you to complete multiple grooming sessions without worrying about losing power mid-trim.
The cordless design gives you maximum flexibility to groom your dog in whatever room they feel most comfortable in.
You can easily recharge the device using any standard USB port, making it highly convenient for home or travel use.
Which speed setting is best for beginners?
We highly recommend starting on the low-speed setting when introducing the grinder to your dog for the first time.
The lower speed produces fewer vibrations and less noise, helping to keep highly sensitive dogs completely relaxed.
Once your dog becomes fully comfortable with the sensation, you can easily switch to the high-speed setting for thicker claws.
Always let your dog’s comfort level and the thickness of their nails guide your selection of the speed setting.
Does the grinding wheel get hot during use?
Our advanced diamond drum bit is engineered with specialized low-heat technology to prevent burning your dog’s paws.
However, we always recommend touching the nail for only two to three seconds at a time to keep it cool.
Alternating between different claws allows any minor residual heat to dissipate naturally before you file that nail again.
This thoughtful approach ensures a completely painless, pleasant, and safe grooming experience for your precious pup.
Conclusion
Knowing how to safely handle a bleeding quick gives you the ultimate confidence during home grooming sessions.
By partnering with Zenpaw, you can easily protect your dog’s paws from future pain and stress entirely.
Ready to transform nail trimming from a battle into a breeze?
Explore the Zenpaw Maxpro 3-in-1 Grinder.
Call: 302-307-1000 — our team can help you advise on the best grooming practices and help with any product questions.