For years, my sweet rescue dog would tremble and cry at the mere sight of traditional metal clippers, leaving us both utterly exhausted and heartbroken after every single attempt. I spent hundreds of dollars on stressful professional grooming visits just to avoid the agonizing fear of accidentally cutting her quick and causing her pain. That was until I discovered how to build a dog sandbox to file nails naturally, combined with the whisper-quiet touch of the Zenpaw Maxpro 3-in-1 Grinder for a truly stress-free paw care routine.
Maxpro 3-in-1 Grinder.
Stress-Free Nail Trimming.
Whisper-quiet DC motor (<40 dB) eliminates fear & discomfort. Features 3 ports, dual speeds, and 7-hour battery life. Safe, precise, and painless.
In This Article
- Step-by-Step DIY Build: Learn how to easily construct a safe, highly effective abrasive play box for claw maintenance.
- Canine Anatomy Deep-Dive: Discover why natural self-filing protects the sensitive quick inside your dog’s nails.
- Abrasive Science: We compare different sand varieties and scratch pads to ensure paw pad safety.
- Instinctual Training Protocols: Master the positive reinforcement methods used to encourage digging games.
- Overcoming Grooming Failures: Avoid horizontal splits, broken nails, and grooming anxiety with Zenpaw.
How to Build a DIY Dog Sandbox to File Nails: A Step-by-Step Guide
Building a natural abrasive digging box is a highly effective way to let your canine companion shorten their own claws through play.
You do not need advanced carpentry skills to build a functional diy sandbox nail filer that lasts for years.
The goal is to select stable, pet-safe materials that can withstand enthusiastic scratching without moving around.
Before beginning, ensure you have a flat, dry area in your backyard or on a spacious patio to place the sandbox.
Prerequisites and Materials You Will Need
To build a durable and highly effective digging box, gather these essential supplies:
- A sturdy heavy-duty plastic storage bin, an old wooden dresser drawer, or a small pre-built wooden sandbox frame.
- Three to four bags of clean, washed natural play sand or coarse-grained construction sand.
- Non-toxic outdoor wood sealant or water-resistant paint if you are using a wooden structure.
- A stiff-bristled brush for regular maintenance and cleanup.
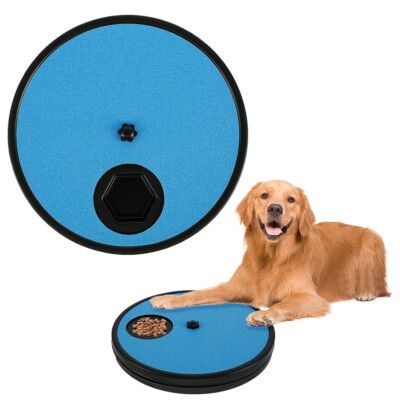
- High-value training treats or dry kibble to hide deep within the sand.
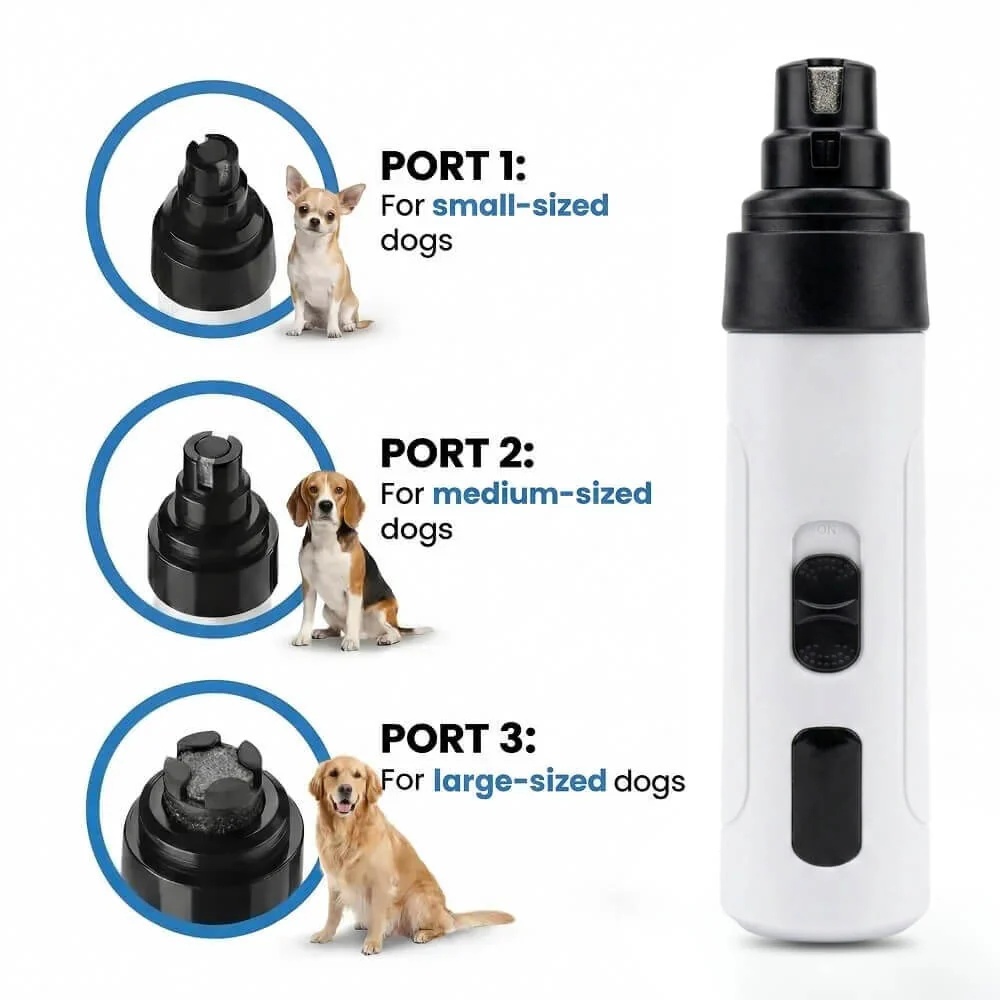
- The Zenpaw Maxpro 3-in-1 Grinder to safely clean up any uneven edges on the rear claws.
-
Step 1: Container Selection and Base Preparation
Select a container that matches the physical size and weight of your dog.
A heavy-duty plastic storage box measuring at least 3 feet long and 2 feet wide works perfectly for medium breeds.
For larger breeds, a sturdy wooden frame made of untreated cedar wood is highly recommended to prevent tipping.
Ensure the walls are low enough for your pet to enter comfortably but high enough to keep the sand inside.
Drill small drainage holes in the bottom of the container if you plan to keep the sandbox outdoors year-round.
-
Step 2: Sand Selection and Safety Checks
Choose washed natural play sand or a coarse-grained utility sand from your local home improvement center.
Avoid fine, dusty desert sands or polymeric joint sands because they contain chemicals that can dry out delicate paw pads.
The sand must be slightly abrasive but smooth enough that it does not cut the soft digital pads.
Run a handful of the sand through your fingers to check for sharp debris, small stones, or glass before pouring.
Always store spare sand in a sealed container to keep it completely dry and clean from neighborhood pests.
-
Step 3: Creating the Base and Stability Layer
Place your container on a stable, level surface to prevent it from sliding during high-energy digging sessions.
If you are placing the sandbox on a smooth patio or deck, slide a heavy rubber utility mat underneath.
Pour a thin layer of coarse gravel or small pea stones at the bottom to improve water drainage if needed.
Cover this drainage layer with a piece of porous landscape fabric to keep the sand from washing away.
Secure the fabric tightly to the inside edges of the bin using heavy-duty, pet-safe adhesive or staples.
-
Step 4: Filling the Sandbox and Distributing the Sand
Pour the washed play sand into your prepared container until it reaches a depth of four to six inches.
This depth allows your dog to dig deep without instantly hitting the hard bottom surface.
Use a hand rake to smooth out the sand and distribute it evenly across the entire surface area.
Lightly mist the sand with clean water to keep the dust down and make digging more physically rewarding.
Make sure the sand is damp but never muddy or waterlogged, which can soften the claws too much.
-
Step 5: Safety Borders and Clean-Up Zone Setup
Wipe down the outer edges of the box to remove any rough splinters or sharp plastic corners.
Place an outdoor mat or a artificial turf rug directly in front of the box entry point.
This catch-mat will clean the dog’s paws as they step out, keeping your home free of stray sand.
Keep a clean, dry towel nearby to quickly wipe down their paws after each active digging session.
Cover the sandbox with a secure lid when not in use to protect the abrasive sand from rain and dirt.
While a DIY sandbox is an exceptional way to let your dog file their front claws naturally, it rarely touches the dewclaws or rear paws.
To achieve a complete, professional, and balanced groom, we recommend using the Zenpaw Maxpro 3-in-1 Grinder on any missed nails.
Our whisper-quiet motor operates under 40dB, keeping your pet calm and relaxed while you touch up the remaining claws.
99-Day 100% Money-Back Guarantee
“Ever since we started using the Zenpaw Maxpro Grinder, it’s been such a peaceful experience. It’s very quiet, and my dog actually relaxes. It’s turned our stressful sessions into quick, quiet grooming times.”
— Sarah M. | ✔ Verified Customer
- ✓ Prevents Infection & Splitting
- ✓ Ideal for All Dog Sizes
- ✓ Low-Vibration Technology
- ✓ Fast 2-7 Days Delivery
Need Support? Call 302-307-1000
Can Dogs File Their Own Nails? The Science of Canine Nail Anatomy

To understand how a dog sandbox nail file works, you must first understand the anatomy of canine claws.
Unlike human nails, which are flat and sit on top of the skin, a dog’s claw wraps completely around a living core called the quick.
The quick is packed with sensitive nerve endings and active blood vessels that supply nutrients to the growing outer shell.
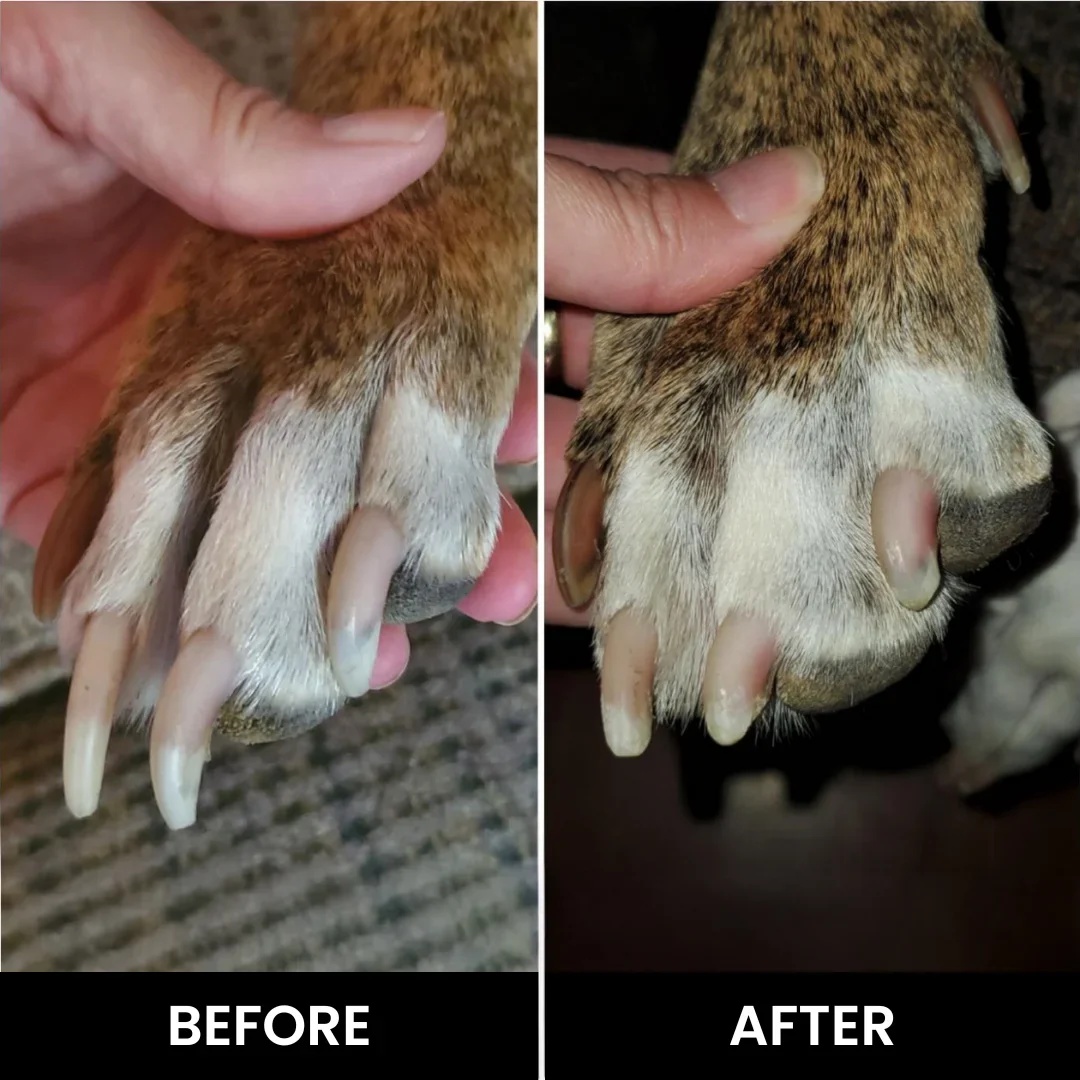
According to veterinary experts at the American Kennel Club (AKC), neglecting claw maintenance causes the quick to grow longer over time.
When the quick is overgrown, traditional metal clippers are highly likely to cut into the live tissue, causing immediate bleeding and intense pain.
A natural scratch box or digging toy uses a dog’s instinctual digging motion to gently wear down the outer keratin shell.
This friction slowly files away microscopic layers of the nail without exerting the sudden crushing force of a metal blade.
As the outer nail wears down gradually, the quick naturally recedes back toward the toe joint, making future trims much safer.
This gradual filing action is incredibly beneficial for anxious pets who suffer from severe grooming phobias.
Using natural digging behaviors is also a highly effective form of mental stimulation that reduces stress-related habits.
However, sand filing is not always perfectly symmetrical, and some claws may still require targeted smoothing.
This is where the whisper-quiet, painless filing action of Team Zenpaw’s Maxpro Grinder provides the perfect finishing touch.
Sand vs. Scratch Pads: Choosing the Best Abrasive for Claw Care
Many pet owners are unsure whether to build an outdoor sandbox or buy a standard emery scratch board.
While both methods rely on friction, they serve different behavioral patterns and physical needs.
Scratch boards require specific training to teach your dog to swipe their paws across a flat piece of sandpaper.
In contrast, a sandbox taps into a dog’s natural, instinctual desire to excavate and search for buried objects.
Let’s look at a detailed comparison of the different self-filing options available for home care:
| Feature / Method | DIY Sand Digging Box | Standard Emery Scratch Pad | Zenpaw Maxpro 3-in-1 Grinder |
|---|---|---|---|
| Primary Motion Used | Instinctual digging and burying | Trained flat paw swiping | Gentle, controlled targeted contact |
| Anxiety Level | Zero anxiety (feels like play) | Very low (requires mild training) | Extremely low (whisper-quiet <40dB) |
| Claws Shortened | Front center claws (primarily) | Front claws only | All claws (front, rear, and dewclaws) |
| Precision & Shape | Natural, slightly rough edges | Flat, directional wear | Perfect, smooth rounded finish |
| Initial Setup Cost | Low to Moderate ($20 – $50) | Low ($15 – $30) | Excellent lifetime value with guarantee |
While sandbox digging is excellent for high-energy dogs, it can leave the nail edges feeling somewhat rough and jagged.
These rough edges can easily snag on expensive indoor carpets or scratch delicate hardwood flooring.
Using the Zenpaw Maxpro Grinder after play allows you to easily round off those rough edges in just a few seconds.
Teaching Dogs to Dig in Sand to File Nails
Simply building a sandbox does not mean your canine companion will instantly understand how to use it.
You must actively teach them through a step-by-step positive reinforcement process to encourage continuous scratching.
Start by letting your pet explore the empty sandbox without any sand inside to build basic comfort.
Praise them warmly and offer high-value treats whenever they willingly step inside the container.
Once they are completely comfortable, add a shallow layer of dry, clean play sand.
Drop a few highly fragrant treats directly onto the surface of the sand while your dog is watching.
As they reach down to eat the treats, they will naturally move some sand with their nose and front paws.
Praise them enthusiastically the exact moment their claws make contact with the sand.
Next, show them a treat and bury it shallowly under a very thin layer of sand right in front of them.
Your dog will naturally use their front paws to swipe the sand away and retrieve the tasty treat.
This simple action forms the foundation of teaching dogs to dig in sand to file nails safely.
Gradually bury the treats deeper into the sand as their digging confidence grows over several days.
Keep these initial training sessions short, positive, and limited to about five minutes to prevent paw pad soreness.
Always inspect their paw pads after every session to make sure the abrasive sand is not causing any redness.
Once they master the digging game, you can introduce your pet to the whisper-quiet Zenpaw Maxpro Grinder for detailed finishing.
To introduce the grinder, start by letting your dog sniff the device while it is turned completely off.
Reward them with a treat for showing curiosity, then turn the quiet motor on at a safe distance.
Because the Zenpaw Maxpro produces less than 40dB of sound, most anxious dogs adjust to the gentle vibration almost immediately.
Gently touch the rotating diamond bit to a single claw at a precise 45-degree angle for no more than two seconds.
This gentle technique ensures a completely painless, professional groom without any of the panic caused by traditional clippers.
Overcoming Risks & Common Mistakes: Balancing Natural Play with Professional Care
While natural scratching is fantastic, relying solely on a sandbox can occasionally lead to unexpected physical issues.
If your dog digs too aggressively or on inappropriate surfaces, they can easily damage their delicate claws.
One common danger of unmonitored digging is a dog nail split horizontally due to uneven force.
A horizontal split can expose the highly sensitive quick, causing severe pain and requiring immediate veterinary attention.
Additionally, if a claw catches on a hidden rock in the sand, you might find a dog nail broke in half.
These broken nails are highly prone to painful bacterial infections and require careful cleaning and trimming.
In extreme cases, high-impact digging on hard container edges can leave a dog nail bent sideways, which is incredibly uncomfortable.
This lateral twisting can put severe pressure on the toe joint and even cause a dog dislocated toe nail if left uncorrected.
To prevent these painful injuries, always sift through the sand regularly to remove any hard pebbles or clumps.
Keep a close eye on their progress, and never let them dig for more than ten minutes at a time.
If you notice any uneven wear or jagged edges, immediately smooth them down using the Zenpaw Maxpro Grinder.
Our grinder’s dual-speed control and three custom ports make it incredibly easy to fix rough edges safely at home.
Using a hanging dog nail trim bag can also help secure highly anxious small dogs while you perform these delicate touch-ups.
By combining natural sandbox play with the precision of Zenpaw, you can easily maintain short, healthy claws without any stress.
Frequently Asked Questions (FAQ)
Is the Zenpaw Grinder safe for very large dog breeds?
Yes, the Zenpaw Maxpro 3-in-1 Grinder is designed with three custom-sized ports to accommodate all dog sizes.
The small and medium ports are perfect for delicate puppy claws, while the wide-open cap handles thick, heavy claws with ease.
Our high-quality brass motor provides powerful rotation to file down even the toughest nails quickly and safely.
How long does the battery last on a single charge?
Our advanced lithium-ion battery provides up to 7 hours of continuous grooming on a single USB charge.
This exceptional battery life means you rarely have to worry about the device dying mid-groom.
The included USB charging cable makes it incredibly convenient to recharge the grinder using any standard wall adapter or laptop.
Which speed setting should I use for my anxious dog?
We highly recommend starting on the low-speed setting to let your pet get used to the gentle vibration.
Once your dog is completely relaxed, you can easily switch to the high-speed setting for faster filing.
Always use short, gentle touches rather than holding the grinding wheel against the nail for long periods.
Does the grinding wheel get hot during extended use?
No, the Zenpaw Maxpro features advanced low-heat technology to prevent heat buildup during use.
Traditional high-speed rotary tools can overheat quickly, causing sudden pain and discomfort to the sensitive quick.
Our pet-safe design keeps the diamond bit cool, ensuring a completely painless and comfortable grooming experience.
Conclusion: Simple, Joyful, and Stress-Free Grooming
Building a custom sandbox allows your dog to shorten their claws naturally while enjoying healthy, instinctual play.
Combine this fun outdoor activity with the whisper-quiet precision of our veterinarian-approved trimmer for complete paw care.
Ready to transform nail trimming from a stressful battle into a peaceful bonding experience?
Explore the Zenpaw Maxpro 3-in-1 Grinder today.
Call our support team at 302-307-1000 — we are always here to help you with expert grooming advice and product questions.
Note: Individual results may vary depending on individual dog breeds, nail thickness, and behavioral temperaments. This article is intended for general pet grooming reference purposes only and does not replace professional veterinary advice.