I still remember the absolute terror in my dog’s eyes every time I brought out the heavy metal clippers, and that cold dread in my chest as I prayed I wouldn’t clip too deep and make him bleed. After years of struggling and tears, I realized I needed a stress-free alternative, which is why learning how to build a dog scratch board diy completely saved our grooming routine and paved the way for pain-free paw care.
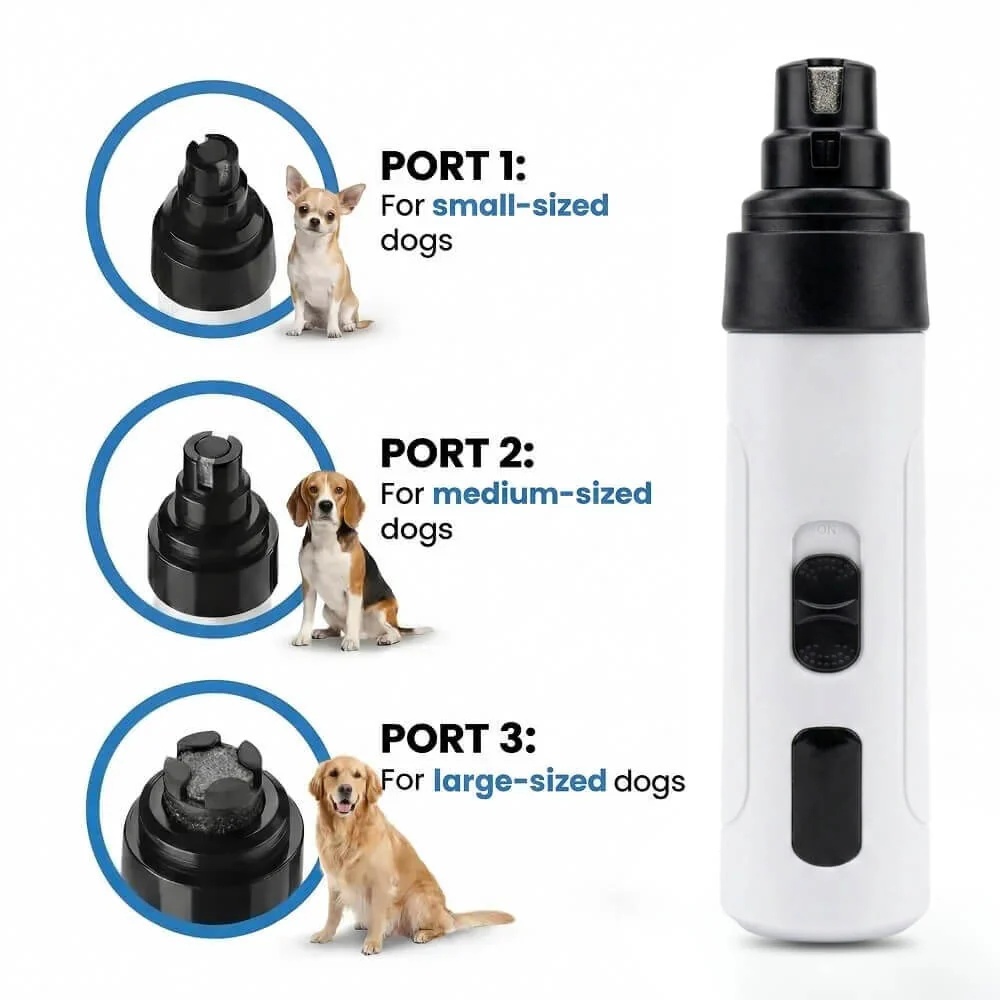
Maxpro 3-in-1 Grinder.
Stress-Free Nail Trimming.
Whisper-quiet DC motor (<40 dB) eliminates fear & discomfort. Features 3 ports, dual speeds, and 7-hour battery life. Safe, precise, and painless.
In This Article
- Step-by-Step DIY Guide: Discover how to easily build an effective scratch board at home using budget-friendly materials.
- Understanding Nail Anatomy: Learn about the canine quick and why traditional nail clipping methods can cause distress.
- Behavioral Training Secrets: Master positive reinforcement techniques to get your dog to file their own claws safely.
- Overcoming Common Risks: Find out how to avoid friction burns, handle uneven filing, and address claw-trimming gaps.
How to Build a DIY Dog Scratch Board for Nail Care: A Step-by-Step Guide
Building a custom scratching pad is a simple weekend project that requires very little technical skill.
Before you begin, you will need to gather a few affordable materials from your local hardware shop or online retailer.
The goal is to create a heavy-duty, slip-resistant surface that allows your dog to file down their nails naturally through positive play.
What You Will Need:
- One flat wooden board (hardwood or plywood, sized to your dog’s build).
- Coarse-grit adhesive sandpaper sheets (typically 80-grit and 120-grit work best).
- Heavy-duty double-sided tape or spray adhesive (if using non-adhesive sandpaper).
- A utility knife or heavy-duty scissors.
- Non-slip rubber pads or drawer liners for the base.
- High-value treats to assist with behavioral training.
-
Step 1: Selecting and Preparing the Wood Base
Choose a sturdy wooden dog nail file board that is proportional to your dog’s size and weight.
For small breeds, a piece of wood measuring 10 by 18 inches is perfectly sufficient.
For large dogs, choose a board that is at least 12 by 24 inches to ensure they have enough surface area to slide their paws.
Smooth out any rough edges or splinters along the sides using a light sanding block to keep your own hands safe during assembly.
-
Step 2: Applying the Non-Slip Backing
Flip your wooden board over to focus on the bottom side first.
Applying rubber cabinet liners or self-adhesive rubber feet to the bottom is essential to prevent sliding.
If the board slips while your dog scratches, it will startle them and ruin their training progress.
Ensure the rubber backing is firmly glued down to all four corners of the board for ultimate stability.
-
Step 3: Measuring and Cutting the Sandpaper
Turn the board back over so the smooth top surface faces upward.
Lay your heavy-duty sandpaper sheets across the wood to measure the layout.
If you have an anxious puppy, using a less abrasive 120-grit paper is a great way to start.
Use your utility knife to trim the sandpaper sheets so they match the exact outer dimensions of your wood block.
-
Step 4: Gluing the Sandpaper to the Surface
Peel the backing off your adhesive sandpaper or apply a thin, even layer of spray adhesive directly to the wood.
Press the sandpaper down firmly, starting from one edge and smoothing it out to the opposite side.
Use a flat tool like a rolling pin or scraper to push out any stubborn air bubbles.
Let the adhesive cure fully for at least two hours before introducing it to your dog’s paws.
-
Step 5: Inspecting the Completed Board
Run your hand lightly over the corners to ensure the paper is completely flush with the wooden edges.
Loose edges can easily peel back when caught by a sharp claw during active scraping.
Once everything is tightly secured, your diy dog nail file board is fully ready for its first training session.
While a homemade scratch board is a brilliant solution for filing front claws, it cannot reach the rear paws or the dewclaws safely.
To provide a truly complete, stress-free grooming routine at home, we highly recommend pairing your new board with the Zenpaw Maxpro 3-in-1 Grinder.
This whisper-quiet tool operates under 40 decibels, making it the perfect companion for detailing the tricky nails your scratch board cannot touch.
99-Day 100% Money-Back Guarantee
“Ever since we started using the Zenpaw Maxpro Grinder, it’s been such a peaceful experience. It’s very quiet, and my dog actually relaxes. It’s turned our stressful sessions into quick, quiet grooming times.”
— Sarah M. | ✔ Verified Customer
- ✓ Prevents Infection & Splitting
- ✓ Ideal for All Dog Sizes
- ✓ Low-Vibration Technology
- ✓ Fast 2-7 Days Delivery
Need Support? Call 302-307-1000
The Biomechanics of Canine Nail Scratching: Understanding the Quick
To safely care for your pet’s paws, you must understand the basic biological structure of a dog’s claw.
Inside each canine nail lies a highly sensitive inner core known as the quick.
The quick contains living blood vessels and nerve endings that feed the hard outer keratin shell.
If you slice or file into this vascular core, it causes sudden pain and profuse bleeding.
Understanding the difference between a dog nail clipper vs grinder is vital for long-term health.
Clippers often apply high pressure that crushes the sensitive nail wall before cutting.
This crushing pressure can lead to painful microscopic splits that reach back into the nail bed.
In contrast, using a scratching surface or a gentle rotary motor allows you to shave off paper-thin layers safely.
If you file the nails on a regular basis, the quick will naturally recede over time.
This makes the safe trimming zone much wider and reduces the risk of accidental injury.
However, if you ever file too deep, you may need to cauterize dog nails to stop the bleeding immediately.
A safe home care routine keeps the claws short without ever inducing pain or anxiety.
Choosing the Right Sandpaper Grit for Your Dog’s Scratch Board
Not all sandpaper sheets are created equal when it comes to dog paws.
Using a grit that is too rough can easily wear down the nail too quickly and scrape the delicate paw pads.
Conversely, a grit that is too fine will only polish the claw without reducing any actual length.
For large, heavy dogs with thick black nails, we recommend starting with a coarse 80-grit paper.
For medium-sized dogs, a balanced 100-grit sandpaper provides the perfect amount of resistance.
Small dogs and young puppies have highly sensitive claws that do best with a gentler 120-grit surface.
Always inspect your dog’s paw pads after a session to ensure there are no signs of redness or irritation.
Practical Training Guide: Teaching Your Dog to Scratch the Board
You cannot simply place a dog nail file board diy on the floor and expect your pet to use it right away.
You must teach them the physical scraping motion using positive reinforcement shaping techniques.
The entire process must be broken down into tiny, highly rewarding steps to keep them motivated.
Phase 1: Building a Positive Association
Lay the dry scratch board flat on the living room floor and let your dog sniff it.
Every single time they investigate or look at the board, give them a tasty treat.
This simple step teaches them that the new object is a source of wonderful rewards.
Phase 2: Encouraging the First Paw Touch
Hold a small treat in your hand and place it directly on top of the sand paper surface.
Wait patiently for your dog to reach out and touch the board with their front paw.
As soon as their claw makes contact with the board, click or say “Yes!” and release the food reward.
Repeat this step until your dog confidently taps the board with their foot on command.
Phase 3: Shaping the Scratching Motion
Begin to slowly hide the treat underneath a thin cloth or towel draped over the board.
Your dog will naturally try to dig at the cloth to get to the hidden food reward.
The digging motion will cause their front nails to scrape against the underlying sandpaper.
Reward them immediately for this active scraping behavior to reinforce the scratching habit.
Phase 4: Tilting the Board for Perfect Leverage
Once they understand the digging motion, elevate the board to a 45-degree angle.
You can lean the wooden frame against your couch or hold it securely in your lap.
An angled board ensures that only the tips of the claws slide down the abrasive grit.
This clever angle protects their soft paw pads from experiencing direct friction damage.
Transitioning to a Complete Grooming System
The scratching board is a brilliant physical outlet, but it cannot groom the dewclaws or rear feet.
Dewclaws do not touch the ground and will keep growing in a circular pattern if left untrimmed.
This is where introducing a quiet, motorized grinder becomes incredibly useful.
By using the best dog nail grinder with light, you can easily illuminate the nail bed.
The bright light reveals the quick on dark claws, giving you the ultimate confidence to trim those tricky spots.
Overcoming Risks: Friction Heat, Over-Filing, and Injury Prevention
While a build a dog scratch pad at home project is safe, it does come with a few common user mistakes.
Friction heat builds up very quickly when a dog scrapes their claws repeatedly across coarse paper.
Always limit your training sessions to a maximum of two minutes at a time to prevent paw overheating.
Another major risk is uneven wear, as some dogs will favor one paw over the other.
Be sure to guide their movements so both sides get equal filing time to maintain structural balance.
Overgrown nails can lead to painful scratches during playtime, making you worry about what happens if dog nail scratches you.
Keeping their claws rounded and smooth is the best way to protect your skin and furniture from accidental harm.
If you happen to over-file a nail and draw a tiny bead of blood, do not panic.
You can quickly apply some household baking soda to stop dog nail bleeding in a pinch.
Having these simple home remedies on hand ensures a calm response to any minor grooming mishaps.
Comparing DIY Scratch Boards and Professional Electric Grinders
Choosing the best tool for your home routine depends heavily on your dog’s temperament and physical needs.
The table below outlines the core differences between a homemade board and a premium electric grinder.
| Grooming Feature | DIY Scratch Board | Zenpaw Maxpro Grinder |
|---|---|---|
| Primary Focus | Flinging the front nails via digging instinct | Complete detailing of all four paws and dewclaws |
| Training Time | Requires 1-2 weeks of behavioral training | Minimal desensitization thanks to quiet motor |
| Rear Claw Access | Extremely difficult to train for back feet | Effortless access at any angle |
| Precision Level | Moderate (depends entirely on dog’s scratching style) | Excellent (allows for surgical micro-trimming) |
| Noise Level | Completely silent | Whisper-quiet (measured under 40 decibels) |
Frequently Asked Questions About DIY Dog Scratch Boards
Is a DIY scratch board safe for all dog sizes?
Yes, you can customize the physical size of your diy dog nail file board to fit any breed.
Just make sure the wooden board is heavy enough not to slip under a larger dog’s weight.
How often should my dog use the scratch board?
Most dogs only need to use the board once or twice a week to maintain their nail length.
Keep a close eye on their claws to make sure they do not get filed down too close to the quick.
Can I use normal sandpaper from my garage?
You can use standard woodworking sandpaper, but adhesive backing sheets are much easier to install.
Look for heavy-duty, water-resistant aluminum oxide paper for the best long-term durability.
What should I do if my dog is afraid of the board?
Go back to the very beginning and focus solely on rewarding them for looking at the board.
Never force their paws onto the abrasive paper, as this will create a lasting negative association.
Does a scratch board work on the back feet?
It is incredibly difficult to train a dog to kick backward to file their rear claws.
For the back feet, using a quiet rotary tool like the Zenpaw Maxpro is by far the easiest and safest solution.
Conclusion
Building a home scratch board is a wonderful way to keep your dog’s front claws tidy and stress-free.
Ready to transform nail trimming from a battle into a breeze?
Explore the Zenpaw Maxpro 3-in-1 Grinder today.
Call us at 302-307-1000 — our friendly team is always here to advise you on safe grooming practices and help with any product questions!
Note: Individual results may vary depending on individual dog breeds, nail thickness, and behavioral temperaments. This article is intended for general pet grooming reference purposes only and does not replace professional veterinary advice.