I still remember the sheer panic when my sweet golden retriever tore his dewclaw on a rough branch, leaving bright red blood pooling on our clean living room rug as he whimpered in absolute confusion. In that stressful moment, finding a secure dog nail bandage felt like a high-stakes emergency, which is exactly why we developed the whisper-quiet, painless Zenpaw Maxpro 3-in-1 Grinder to stop painful nail splits before they ever start.
Maxpro 3-in-1 Grinder.
Stress-Free Nail Trimming.
Whisper-quiet DC motor (<40 dB) eliminates fear & discomfort. Features 3 ports, dual speeds, and 7-hour battery life. Safe, precise, and painless.
In This Article
- Discover the step-by-step method to clean, disinfect, and apply a secure dog nail bandage on an active pet.
- Understand the complex vascular anatomy of canine claws to safely locate the sensitive quick.
- Master professional desensitization and wrapping techniques to keep injured claws completely safe from infection.
- Avoid critical first-aid errors that delay healing and compromise your dog’s physiological wellness.
How to Dress and Bandage a Damaged Dog Claw: A Step-by-Step Guide

Managing an unexpected paw injury requires a calm mind, immediate action, and the correct first-aid tools.
Before you begin wrapping a damaged dog claw, you must assemble all necessary medical supplies to avoid interrupting the process once your dog is positioned.
Gather sterile non-stick gauze pads, self-adhesive veterinary wrap, medical-grade tape, professional styptic powder, and a safe disinfectant solution.
Step 1: Stay Calm and Prepare Your Environment
The sudden sight of dripping blood can easily cause any loving pet parent to panic.
Your dog will immediately sense your elevated heart rate and corresponding emotional stress.
Take a deep, slow breath to stabilize your emotions before reaching for your injured pet.
Choose a quiet, well-lit room away from any environmental distractions or other household animals.
If your dog is highly anxious about paw handling, you can swaddle dog to cut nails or bandage wounds safely.
Arrange all of your medical supplies neatly on a clean towel within easy reach of your hands.
Keep a handful of high-value treats nearby to reward cooperative behavior throughout the dressing session.
Step 2: Stop the Bleeding Safely
Canine claws contain a highly vascular inner core known as the sensitive quick.
An injured claw will bleed heavily and often looks far worse than it actually is.
Do not attempt to inspect the wound details closely while active bleeding is occurring.
Pour a generous amount of professional styptic powder directly onto the exposed bleeding quick.
If you do not have styptic powder, clean cornstarch or baking soda works as an effective alternative.
Use a sterile, non-stick gauze pad to apply continuous, firm pressure to the tip of the claw.
Maintain this firm pressure steadily for at least two full minutes without lifting the pad.
Avoid rubbing or wiping the area, as this can easily break the newly formed blood clot.
Step 3: Clean and Disinfect the Affected Paw
An open claw wound is highly vulnerable to bacterial invasion from soil and floor dust.
Once the bleeding has completely stopped, you must gently sanitize the entire area.
Flush the wounded claw with a veterinary-approved antiseptic chlorhexidine solution.
Avoid using standard hydrogen peroxide because it can damage healthy cells and delay recovery.
Gently pat the surrounding fur and paw pads dry with a clean, lint-free paper towel.
Ensure there are no lingering debris, dirt particles, or loose fibers near the torn nailbed.
Examine the area carefully to see if the claw is completely detached or still hanging painfully.
Step 4: Place the Non-Stick Dressing Cushion
A raw, exposed quick is incredibly sensitive to any physical contact or ground pressure.
You must cushion the area carefully before applying the outer compressive layers.
Place a sterile, non-stick pad directly over the clean, dry claw wound.
Avoid using standard fluffy cotton balls because their loose fibers will stick stubbornly to the raw flesh.
Position the pad so it fully shields the injured toe from any friction.
Ensure the protective layer remains flat and does not bunch up uncomfortably between the toes.
This soft cushion acts as the primary shock absorber when your dog attempts to stand.
Step 5: Apply the Vet-Approved Elastic Self-Adhesive Bandage
Securing a proper dog nail bandage requires a careful, methodical wrapping technique.
Always wrap the elastic cohesive bandage starting at the toes and moving gently upward.
Wrap the material smoothly around the entire paw, including the dewclaw if present.
Ensure the bandage is snug enough to stay in place without slipping off the sleek fur.
However, you must avoid wrapping it too tightly to prevent cutting off healthy blood circulation.
Verify the correct tension by slipping two fingers easily under the top edge of the wrap.
Secure the loose end of the self-adhesive bandage by pressing it firmly against itself.
Step 6: Keep the Dressing Dry and Clean
A wet bandage will quickly draw harmful environmental bacteria directly into the wound.
Keep your dog indoors on clean, dry surfaces as much as possible during the recovery phase.
When taking your pet outside for quick bathroom breaks, protect the bandage from damp ground.
Cover the wrapped paw with a temporary protective dog bootie or a heavy-duty plastic bag.
Remove the plastic covering immediately once you return indoors to prevent moisture buildup.
Inspect the entire bandage twice daily for any signs of sliding, dampness, or chewing.
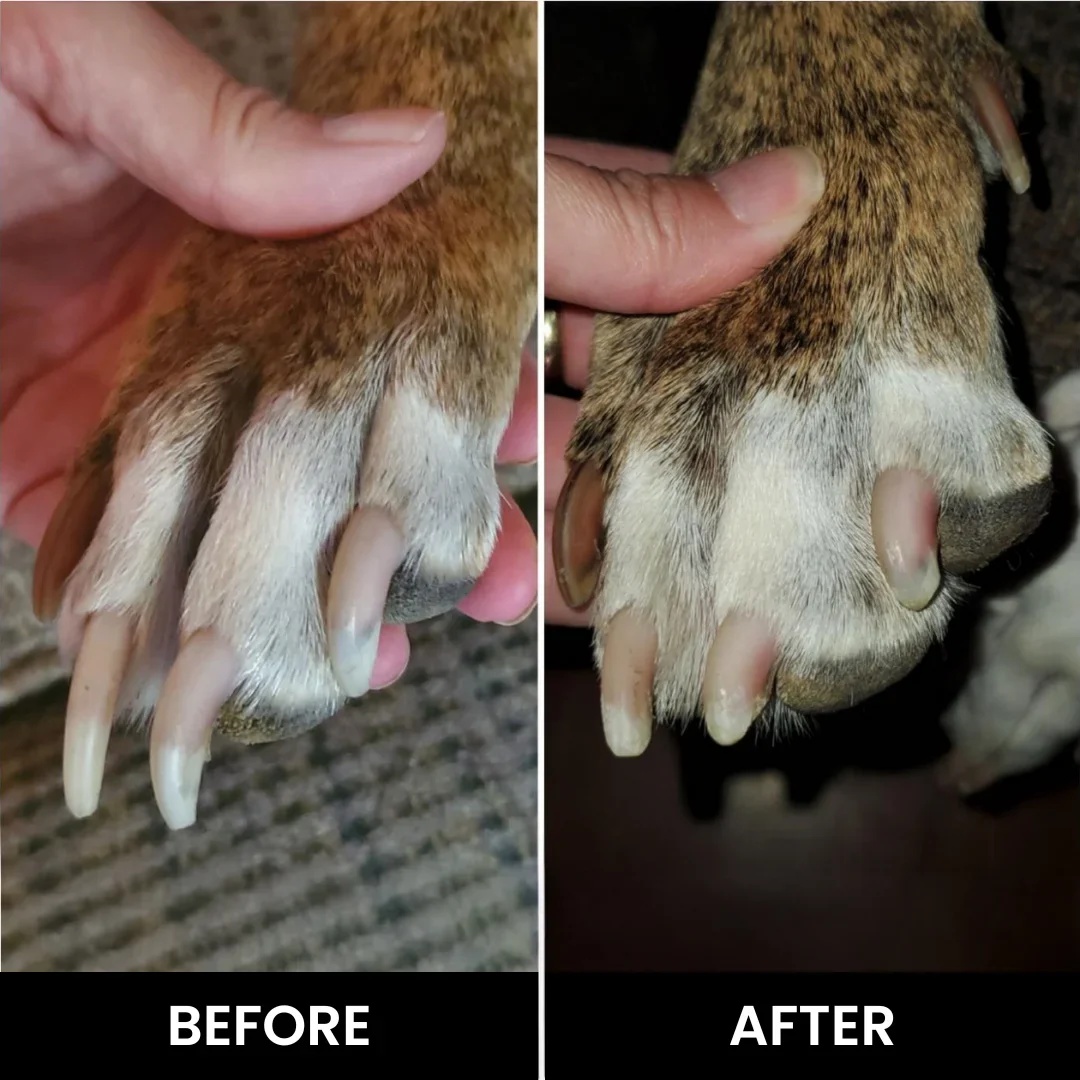
Once your dog’s damaged claw heals completely, maintaining proper nail length is the absolute best way to prevent future painful splits and tears.
The Zenpaw Maxpro 3-in-1 Grinder offers a safe, whisper-quiet, and painless solution to keep claws short and smooth.
Regular grooming with our veterinarian-approved tool eliminates the dangerous cracking caused by traditional metal clippers.
99-Day 100% Money-Back Guarantee
“Ever since we started using the Zenpaw Maxpro Grinder, it’s been such a peaceful experience. It’s very quiet, and my dog actually relaxes. It’s turned our stressful sessions into quick, quiet grooming times.”
— Sarah M. | ✔ Verified Customer
- ✓ Prevents Infection & Splitting
- ✓ Ideal for All Dog Sizes
- ✓ Low-Vibration Technology
- ✓ Fast 2-7 Days Delivery
Need Support? Call 302-307-1000
Understanding Canine Nail Anatomy: The Crucial Role of the Quick

Your dog’s claws are structural extensions of their distal phalanges.
Unlike human fingernails, canine claws are actually fused directly to the underlying skeletal bone.
The outer layer consists of a tough, protective sheath made of specialized alpha-keratin.
Underneath this hard keratin shell lies the quick, which is a living, highly vascular tissue.
The quick contains a complex network of blood vessels and extremely sensitive nerve endings.
When your dog’s nails grow too long, the quick stretches outward along with the keratin shell.
This makes the nail far more vulnerable to painful snags and structural splitting.
Long, neglected nails can also force your dog to alter their natural walking gait.
This unnatural posture puts excessive pressure on their joints and can lead to early arthritis.
According to veterinary experts, keeping nails short is vital for overall skeletal health.
For active or highly resistant pets, you can build a customized dog sandbox to file nails as an excellent alternative.
This allows your dog to naturally wear down their front nails through fun scratching behaviors.
However, standard maintenance still requires a high-quality, precise grooming tool.
Regular grooming helps the quick recede gradually over time, reducing the risk of trauma.
Understanding this anatomy is the first step toward preventing emergency nail injuries.
How to Bandage Dog Paw for Broken Nail Injuries: The Science of Non-Slip Wraps
Mastering the technique of wrapping a damaged dog claw is a vital skill for every pet owner.
A broken nail can cause immense distress, causing your dog to limp or cry out in pain.
Applying a protective paw wrap helps prevent further damage to the exposed nailbed.
The primary goal of a paw bandage is to keep the wound clean while preventing self-mutilation.
You must use high-quality materials that provide both structural support and breathability.
Elastic cohesive bandages are ideal because they grip themselves without sticking to the fur.
When applying the wrap, always include the entire paw to distribute pressure evenly.
Never leave the dewclaw exposed if it is located near the wrapped area.
The friction from the bandage can rub the dewclaw raw, creating a second painful wound.
If your dog is extremely fearful or aggressive during treatment, do not force the issue.
You can speak to your trusted veterinarian about prescribing gabapentin for dogs to cut nails or wrap wounds stress-free.
This veterinary-approved medication helps calm their nervous system during medical handling.
Once the dog is relaxed, you can apply the wrap safely and efficiently.
Always monitor the temperature of the toes below the bandage to ensure healthy blood flow.
If the toes feel cold or look swollen, remove and reapply the wrap immediately.
How to Identify Different Types of Claw Trauma: When to Visit the Vet
Not all nail injuries are created equal, and some require professional medical intervention.
A simple split at the very tip of the nail can usually be managed safely at home.
However, a complete nail tear where the claw is hanging by a thread is a different story.
This type of injury is excruciatingly painful and often requires a local anesthetic to treat.
You should look for signs of severe trauma like a fully exposed, bleeding bone.
If the nailbed is swollen, hot to the touch, or oozing yellow pus, an infection is present.
Persistent limping, whining, or hiding indicates that your dog is in severe pain.
If the bleeding does not stop after ten minutes of continuous pressure, seek emergency care.
Your veterinarian can safely trim away the damaged portion of the nail under sedation.
They can also prescribe oral antibiotics to prevent deep bone infections.
Never attempt to perform complex surgical procedures or deep cuts on your dog’s paw at home.
Acting as a cooperative partner with your vet ensures your pet receives the highest level of care.
Desensitizing Your Dog to Paw Handling and Safe Grooming Tools
Many dogs develop a severe phobia of paw handling due to past grooming trauma.
Traditional metal clippers can violently crush the nail, causing sharp pain even if you miss the quick.
This negative experience makes future bandaging and nail trimming incredibly difficult.
To overcome this fear, you must implement a systematic desensitization protocol.
Start by touching your dog’s shoulder and feeding them a high-value treat.
Gradually move your hand down to their elbow, then their wrist, and finally their paw.
Only touch their paw for a single second before rewarding them with a delicious treat.
Repeat this exercise daily until your dog looks forward to paw handling.
Next, introduce the whisper-quiet sound of the Zenpaw Maxpro 3-in-1 Grinder.
Our specialized motor operates at less than 40dB to prevent triggering your dog’s startle reflex.
Let your dog sniff the turned-off device while feeding them premium treats.
Turn the grinder on at its lowest speed while holding it a few feet away from your pet.
Reward their calm behavior with enthusiastic praise and their favorite snacks.
Slowly bring the humming device closer until they allow you to touch the handle to their paw.
The gentle, low-vibration technology helps your dog remain completely relaxed.
When you are ready to file, hold the grinder at a precise 45-degree angle to the claw.
This angle matches the natural slope of the nail and avoids damaging the quick.
Grate the nail in brief, two-second intervals to prevent friction heat from building up.
For dogs with sensitive paws, you can temporarily apply safe dog nail caps for hardwood floors during recovery.
These protective caps prevent the damaged nail from catching on rough rugs or hardwood.
Once the claw is fully healed, you can even apply stylish dog nail polish for a fun grooming day.
Crucial Mistakes to Avoid When Managing Dog Claw Trauma
One of the most prevalent errors pet parents make is leaving a bandage on for too long.
A bandage left on for multiple days without inspection can trap moisture and cause severe skin infections.
You must remove the dressing daily to check the healing progress of the claw.
Another serious mistake is wrapping the paw too tightly in an attempt to keep it secure.
This restricted blood flow can lead to permanent nerve damage or tissue necrosis.
Always check your dog’s behavior for signs that the wrap is causing discomfort.
If your dog chews frantically at the bandage, it is likely too tight or irritating.
Never apply human antiseptic ointments like Neosporin without your veterinarian’s direct approval.
Some human medications contain ingredients that are highly toxic to dogs if licked and swallowed.
Avoid using dull, traditional scissors to cut away hanging nail fragments at home.
Rough cuts can cause the nail to split further up into the sensitive nailbed.
Instead, use the gentle filing power of the Zenpaw Maxpro to smoothly round off sharp edges.
This prevents the damaged nail from catching on household objects during daily play.
Rushing your dog’s recovery can lead to chronic pain and long-term behavioral issues.
Patience and gentle tools are the absolute keys to successful paw rehabilitation.
| Injury Severity | Recommended First Aid Action | Veterinary Intervention Required? |
|---|---|---|
| Minor Keratin Split | File smooth, disinfect, apply protective wrap. | No, unless signs of pain persist. |
| Exposed Bleeding Quick | Apply styptic powder, pack with gauze, wrap firmly. | Only if bleeding continues past 10 minutes. |
| Hanging/Fractured Claw | Sanitize, apply pressure bandage, restrict movement. | Yes, to safely remove loose nail fragments. |
| Swollen/Infected Nailbed | Flush with antiseptic, leave unwrapped, consult vet. | Yes, requires prescription antibiotics. |
Frequently Asked Questions About Dog Nail Bandages and Care
It should be snug enough to stay in place but loose enough to preserve healthy blood circulation.
You must be able to slide two fingers easily under the top edge of the bandage.
Always check the toes below the wrap for swelling, coldness, or signs of discomfort.
You should change the dressing at least once every 24 hours.
If the wrap becomes wet, dirty, or slipped, change it immediately.
A clean, dry wound environment is crucial for fast, complication-free healing.
No, you should never use standard human adhesive bandages on a dog.
The adhesive will stick aggressively to their fur, causing immense pain when removed.
Always use self-cohesive veterinary wraps that stick only to themselves.
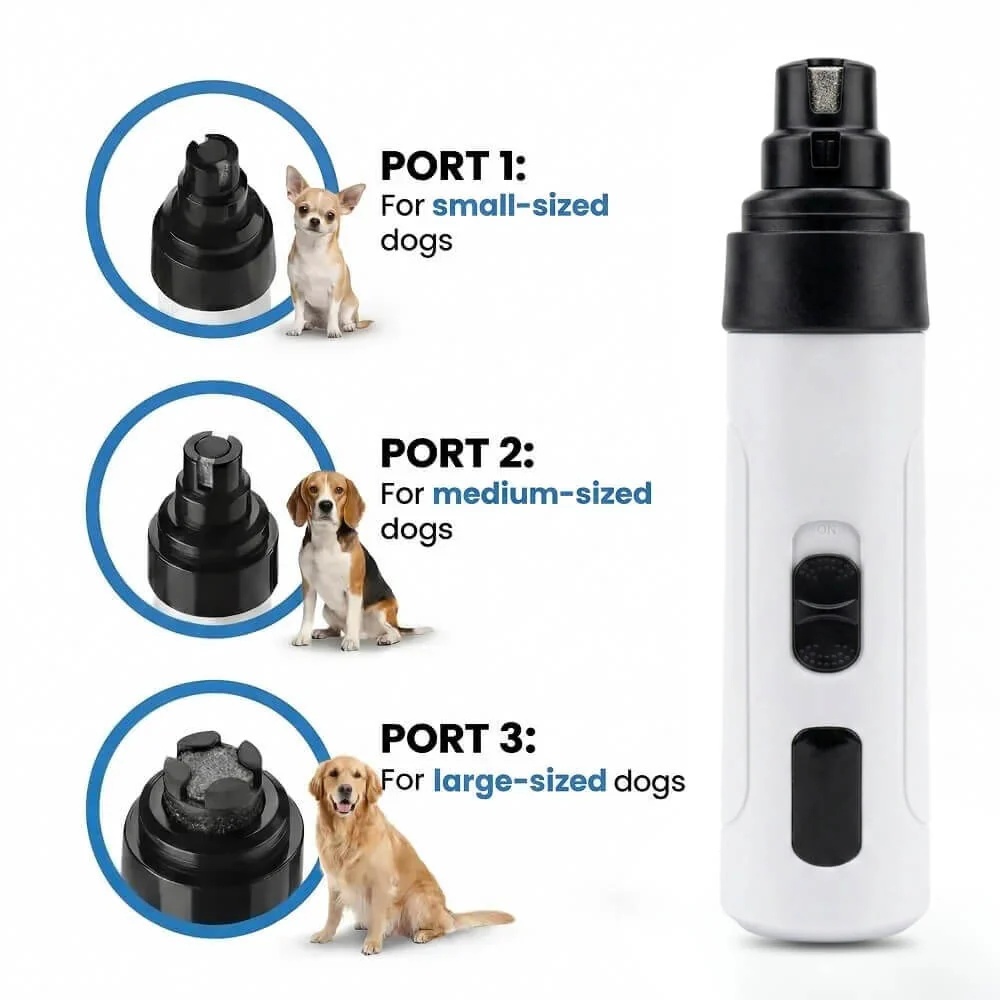
Yes, the Zenpaw Maxpro features three specialized ports designed to accommodate small, medium, and large breeds.
Our high-power motor handles even the thickest nails with ease.
It operates with low vibration to keep larger, stronger dogs calm and cooperative.
The rechargeable battery delivers up to 7 hours of continuous grooming power.
It charges quickly via any standard USB port for maximum convenience.
This long battery life ensures you never run out of power mid-session.
No, our advanced low-heat technology prevents heat buildup on the nail.
However, we still recommend grinding in short, two-second bursts for safety.
This technique ensures a completely painless and comfortable experience for your pet.
Conclusion: Safe Paws, Happy Bonds
Protecting your dog’s paws starts with proper care for claw trauma and continues with gentle, stress-free maintenance.
The right bandaging technique keeps your pet safe, while the right tools prevent future split claws.
Ready to transform nail trimming from a battle into a breeze?
Explore the Zenpaw Maxpro 3-in-1 Grinder.
Call: 302-307-1000 — our team is here to help!